 In an effort to streamline installation of the CLIQ.mini we have replaced the USB power supply with a network cable to be used with the PoE injector. Both wired and wireless installations will now use the PoE injector with the included LAN cable for power. You can view the revised installation method below, or by watching our latest Tech Tuesday:
Want to learn more about installing the CLIQ.mini? Check out our latest Tech Tuesday.
To connect the CLIQ.mini using Wi-Fi, you will need access to the install Assist App, a CLIQ.mini controller, and the home’s Wi-Fi network.
Simple Setup Using Wi-Fi Connection
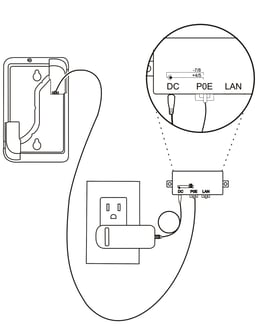
Step 1: Connect the CLIQ.mini to the included PoE injector using an Ethernet cable.
Step 2: Download the Install Assist App.
Step 3: Open the Wi-Fi settings on your phone and connect to the CLIQ.mini’s network (Clare Wi-Fi XXXX).
Step 4: Open the Install Assist App and tap the configure Wi-Fi button.
a. Enter the homes Wi-Fi SSID and password - Tap Next and follow the on-screen instructions.
b. Wait for the LED on the CLIQ.mini to turn solid blue. The CLIQ.mini is now connected.
NOTE: If the LED does not change to solid blue, see the Additional Information page on the back of your Quick Start Guide.
Step 5: Reconnect your mobile device to your home’s Wi-Fi, and then re-open the Install Assist App.
Step 6: You can now use Install Assist to add smart home devices. Refer to the Clare Controls Knowledge Base for information on supported devices.
NOTE: A Fusion project will also need to be created.
Have Questions?
Clare Dealer Technical Support:
US: 941.404.1072
CA: 844.360.4806
claresupport@clarecontrols.com
Monday-Friday: 8AM to 8PM EST
View the Clare Knowledge Base

