The Clare Video Doorbell v3 can be used with ClareVision Plus (CVP) Network Video Recorders (NVRs) and Luma NVRs. See the sections below for setup.
CVP NVRs
The Clare Video Doorbell v3 is compatible with all ClareVision Plus (CVP) and Legacy ClareVision Network Video Recorders (NVRs). Follow the steps below to add the doorbell and start recording to an NVR.
Need to Know
General need to know information for using the CVD v3 with CVP NVRs.
- Legacy NVRs don't support the max resolution of the CVD v3. Resolution must be changed for legacy NVRs .
Adding the doorbell to an NVR
The Clare Video Doorbell v3 Camera must be added to an NVR to enable recording.
Note: We recommend using Internet Explorer in compatibility mode for NVR management.
To add the doorbell to a ClareVision Plus 16, 32, and 64 channel NVR:
- Browse to the NVR’s IP address.
- Login with the NVR’s credentials.
Note: These credentials were created when the NVR was added using the ClareVision Plus App. - Browse to Camera Management.
Configuration > System > Camera Management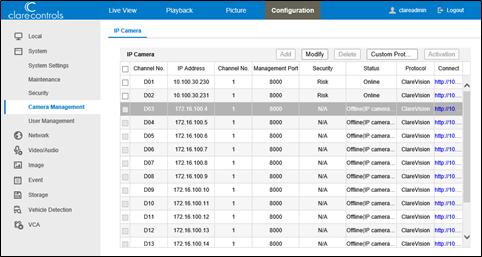
- Select the first available unused channel by clicking on the IP address.
Note: The physical PoE port allocated to the doorbell is disabled and will no longer support a physical connection.
- Click Modify.
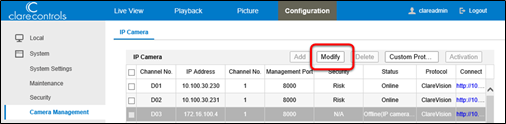
The IP camera configuration pop-up displays.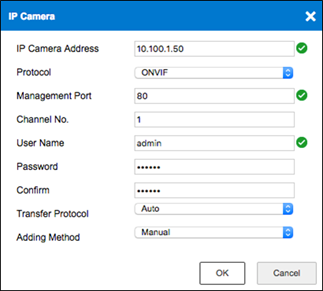
- Configure the camera's settings and set a DHCP reservation.
IP address: The doorbell’s network address.
Note: Find the IP address of the camera using an IP scan tool like Fing, available for free on iOS and Android.
Protocol: ONVIF
Username: admin
Password: doorbell’s verification code
Note: The password is the 6-digit verification code on the rear label of the doorbell. The password must be entered using all capital letters.
Adding Method: Manual
- Click OK.
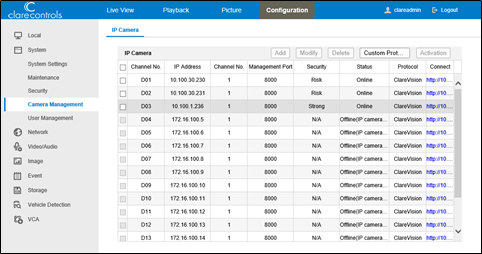
The doorbell camera is added and is now online. If the camera is not online, refresh the page. If the camera is not online after a refresh, verify and re-enter the settings as needed.
- Tap Storage, and then set the doorbell camera’s record schedule to Event.

- Click the Live View tab, and then select the doorbell camera.
The stream displays.
To add the doorbell to a ClareVision Plus 4 and 8 channel, and Legacy ClareVision NVR:
- Browse to the NVR’s IP address.
Note: We recommend using Internet Explorer in compatibility mode for NVR management.
- Login with the NVR’s credentials.
Note: These credentials were created when the NVR was added using the ClareVision Plus App. - Browse to IP Camera.
Configuration > Remote Configuration > Camera Management > IP Camera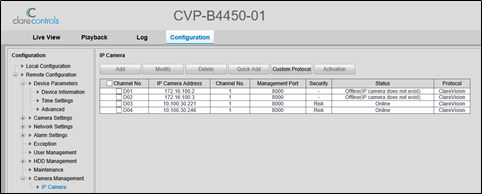
- Select the first available unused channel by clicking on the IP address.
Note: The physical PoE port allocated to the doorbell is disabled and will no longer support a physical connection.
- Click Modify.

The IP camera configuration screen displays.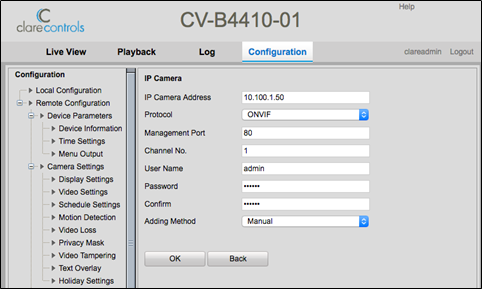
- Configure the camera’s settings and set a DHCP reservation.
IP address: The doorbell’s network address.
Note: Find the IP address of the camera using an IP scan tool like Fing, available for free on iOS and Android.
Management Port: 80
Protocol: ONVIF
Username: admin
Password: doorbell’s verification code
Adding Method: Manual
- Click OK.
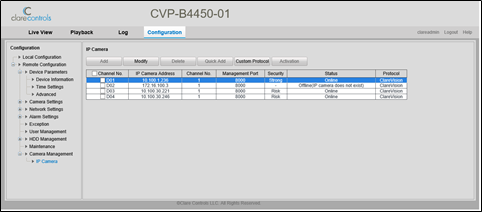
The doorbell camera is added and is now online. The doorbell camera is added and is now online. If the camera is not online, refresh the page. If the camera is not online after a refresh, verify and re-enter the settings as needed.
- Browse to Video Settings.
Remote Configuration > Camera Settings > Video Settings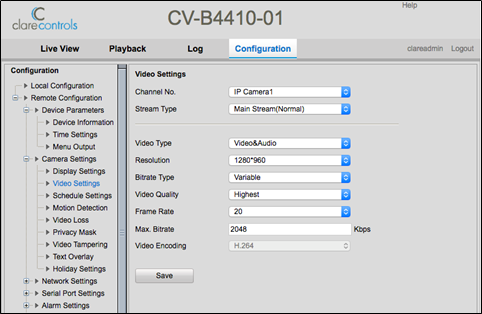
- Set Resolution to 1280 x 960, and then click Save.
Note: The legacy NVRs cannot support the max resolution of the v3 doorbell. Adjusting the resolution corrects this issue. - Click the Live View tab, and then select the doorbell camera.
The stream displays.
Note: There is no need to set a motion detection grid area, recordings are triggered with the PIR sensor.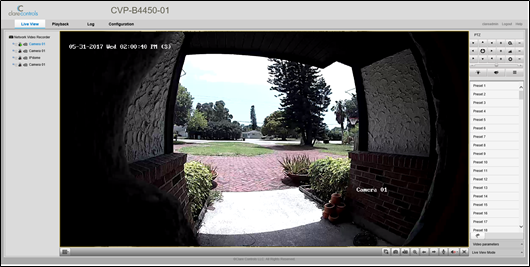
Full PDF - Using a Clare Video Doorbell v3 with a ClareVision Plus or Legacy NVR Tech Bulletin (DOC ID 1925)
Luma NVRs
This section walks a user through the process of using a ClareVision Doorbell v3 with Luma Network Video Recorders (NVRs).
Need to Know
General need to know information for using the CVD v3 with Luma NVRs.
- The Luma Utility app is a Windows only app.
Clare Video Doorbell – v3
Note: The CVD – v3 will be available in the Snap One store soon.
Follow the instructions below to use the CVD – 3 with a Luma NVR.
To use the CVD – v3 with Luma NVRs:
- Log in to the Luma NVR using a web browser. See Luma documentation for accessing a Luma NVR using a web browser.
- Click Settings (double cog icon) in the side-menu.
- Click Camera Management, and then click on the row of an unused camera channel - selecting the row.
- Click Modify in the top row of the cameras table.
- Configure the IP camera options dialog to match the below settings.
Adding Method: Manual
Protocol: ONVIF
Management Port: 80
User Name: admin
IP address: CVD’s IP address
Note: We recommend using a DHCP reservation in the router to prevent a change in the CVD IP address. If the CVD obtains a new IP address, it breaks the network connection with the NVR.
Password: Enter the 6-character verification code associated with the CVD
- Click OK to save.
Notes
• Alarm notifications in the app do not have to be enabled for the NVR to get motion events.
• The CVD -v3 only has one camera stream.
Full PDF - Using ClareVision Doorbells with Luma NVRs Tech Bulletin (DOC ID 1920)
< Clare Video Doorbell v3 Standard Installation
Related Articles:
Clare Video Doorbell v3 Introduction
Clare Video Doorbell v3 Standard Installation
Clare Video Doorbell v3 Installation and User Guide
Using a Clare Video Doorbell v3 with a ClareVision Plus or Legacy NVR Tech Bulletin (DOC ID 1925)
Using ClareVision Doorbells with Luma NVRs Tech Bulletin (DOC ID 1920)
Using Luma Cameras with ClareHome Tech Bulletin (DOC ID 1921)
ClareVision Plus NVRs and Luma 110 and 300 Series Cameras Tech Bulletin (DOC ID 1922)
Clare Video Doorbell v2 Advanced Setup