| Doorbell Comparison | ClareVision Plus (CVP) | Luma |
|
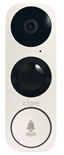
Clare Video Doorbell v3
|
✔ |
✔ |
|
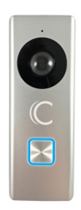
Clare Video Doorbell v2 (B2DB50-ODIW)
|
✔ See: Using a Clare Video Doorbell with a ClareVision+ or Legacy NVR Product Bulletin |
✔ See: Using ClareVision Doorbells with Luma NVRs Tech Bulletin (DOC ID 1920) |
Installation - Do's and Don'ts
When installing the Clare Video Doorbell (CVD) v3, make sure you pay attention to the do's and don'ts.
Don'ts
- Don't enable smart phone's "Do not disturb". When enabled it will prevent the Stay Connected to network pop-up which prevents CVD v3 installation.
- Don't arbitrarily select a chime type. Ensure that the chime type is consistent actual installed chime. If you select the wrong chime type, the doorbell will not chime and may cause damage to the CVD v3.
- Don't forget to enroll the doorbell.
- Don't connect more than 1 CVD v3 to a chime circuit.
Do's
- Do save the verification code for the homeowner.
- Do save the box and all contents, including tools and extra faceplace for the homeowner.
- During doorbell installation, your phone connects to the doorbell's broadcasted network.
That network does not have internet, so the smartphone may ask if you want to stay connected to that network. Tap Yes. - Do make sure that your app and iOS/Android versions are up to date.
- Do verify that power is turned off before wiring the doorbell.
- Do verify the signal strength where the doorbell will be installed.
- Do always install the power kit.
- Do wait 30 minutes for the doorbell chime to power up before thinking that there is a chime issue.
- Do install the fuse when no chime is installed.
- Do ensure that only one CVD v3 is connected to a chime.
General Need to Know
General need to know information for installing the CVD v3.
- The CVD v3 currently only has 1 stream.
- The CVD v3 cannot be added in Fusion or ClareHome.
To view the doorbell stream in the ClareHome, the CVD v3 must be added to a CVP NVR in the project. See Clare Video Doorbell v3 Advanced Setup.
Standard Installation
Before starting installation, make sure to shut off the doorbell’s power supply at the breaker panel.
Installation notes
- You may need a pencil and power drill.
- Install the Power Kit on the chime. All chimes require power kit installation. If no chime is installed, skip power kit installation and install the doorbell following option B.
- Required operating voltage range is 10 to 24VAC.
- Analog chimes may not operate correctly when operating voltage is less than 15VAC.
Power kit installation
Follow these instructions to ensure that the power kit is installed correctly. Serious injury or death may occur if any of the warnings are ignored. Injury or equipment damage may occur if any of the cautions are neglected.
Note: The power kit must be on every chime, digital and analog.
Wiring overview
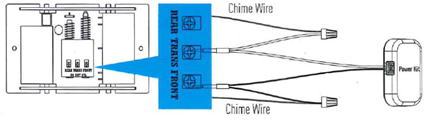
To install the power kit:
- Shut off the electricity at the doorbell’s circuit breaker.
- Insert one end of the wire harness into the power kit.
- Remove the mechanical chime’s cover.
- Remove the existing chime wires from the terminals labeled TRANS and FRONT.
- Connect the wire harness to the chime’s terminals labeled TRANS and FRONT.
- Insert the existing chime wire and the other end of the wire harness into the wire connector and twist it tightly. Repeat this step for the other chime wire.
- Mount the power kit to the side of the chime.
- Replace the chime cover.
Clare Video Doorbell (CVD) installation
Follow these instructions to ensure that the doorbell is installed correctly. Serious injury or death may occur if any of the warnings are ignored. Injury or equipment damage may occur if any of the cautions are neglected.
To install the doorbell:
- Shut off the electricity at the doorbell’s circuit breaker.
- Remove the existing doorbell and disconnect the wires to the screws on the back.
- (Optional) If the wall is uneven, paste the foam plate to the mounting plate.
- Insert the mini-level into the mounting plate, and then mark the drill points when the level’s bubble stays in the center.
Note: Remove the mini-level after marking the drill points. - Drill holes according to the drill points, and then insert the anchors.
- Fix the mounting plate to the wall.
Make sure to pull the doorbell wires through the center of the wedge. - Remove the doorbell’s faceplate by firmly holding the doorbell and gently pressing down on the doorbell button and edge of the camera lens.
- If you have a chime installed follow option A; if not, follow option B.
Option A
Connect the doorbell wires to the leads on the back panel of the doorbell.
Option B
Connect the doorbell wires to the fuse wires, and then connect the fuse wires to the leads on the back panel of the doorbell.
9. Use the doorbell screws to affix the doorbell to the mounting plate.
10. Restore the electricity at the breaker, and then follow the instructions to setup the doorbell in the ClareVision Plus app.
Note: Do not replace the faceplate until after you have added to the doorbell to the ClareVision Plus (CVP) app.
Notes
- The doorbell is ready to be configured when the doorbell light ring flashes blue.
- Verify all power connection if the doorbell ring fails to illuminate.
The v3 doorbell contains an internal battery which maintains power while activating the chime. The battery may take up to 3 hours to charge. During this time, the chime may not activate when the doorbell button is pressed.
Full PDF - Clare Video Doorbell v3 Installation and User Guide (DOC ID 1890)
Clare Video Doorbell v3 iOS - Standard Installation Video
This video walks the user through adding the CVD v3 using an iOS device.
Clare Video Doorbell v3 Android - Standard Installation Video
This video walks the user through adding a CVD v3 with an Android device.
Clare Video Doorbell v3 Advanced Settings
This video walks the user through the CVD v3's advanced settings.
Related Articles:
Clare Video Doorbell v3 Introduction
Clare Video Doorbell v3 Advanced Setup
Clare Video Doorbell v3 Installation and User Guide
Using a Clare Video Doorbell v3 with a ClareVision Plus or Legacy NVR Tech Bulletin (DOC ID 1925)
Using ClareVision Doorbells with Luma NVRs Tech Bulletin (DOC ID 1920)
Using Luma Cameras with ClareHome Tech Bulletin (DOC ID 1921)
ClareVision Plus NVRs and Luma 110 and 300 Series Cameras Tech Bulletin (DOC ID 1922)
Clare Video Doorbell v2 Advanced Setup