Contents
Change Highlights
FusionPro Sections
Management Areas
Managing Accounts
Configuring Central Stations
Testing Central Station Connection
Associating an Account with the Central Station
Managing ClareOne
Service Plans
Devices
Activity Log
Actions
Maintenance
Communication Log
Additional Menu Items
Central Station Monitoring - Bringing it all together
Introduction
FusionPro is the cloud enabled management portal designed to assist partners with the installation and ongoing management of the ClareOne home intrusion and automation platform.
The revitalized edition of FusionPro has all the same basic functionality as the original FusionPro, and some added features to make it even easier to use.
All new partners must have a Clare Partner Account set up before they can have access to FusionPro.
Change Highlights
- Improved look and design focused on simplifying installation, account management, and maintenance.
- New Navigation side bar providing more working space.
- Title bar page summary info and quick access to commonly used functions.
- Launch account searches from the Home Page.
- New Customer Service Contact info added to Company Page, the information entered here is used to inform customers who to contact if they want to make additional purchases or upgrade their service plan.
- New context sensitive 3-dot Menu
- ClareOne, as a device, now appears on the Account Slide-out menu and does not require going into Devices to manage.
FusionPro Sections
FusionPro is divided into different sections for easy navigation. Those sections are
- Navigation Side Bar – Provides access to all management areas (Home, Accounts and Companies), FusionPro Help, What’s New with Clare, and Login information.
- Title Bar – The Title Bar displays different information depending on which management area has the focus. Additional details regarding the Title bar are provided in the overview for each management area.
- Slide-out Menu – An expandable/collapsible menu, instead of tabs, to provide quicker access to specific detail areas in Accounts.

Management Areas
3-Dot Menu & Associated Wizards
Most of the new account management pages have a 3-Dot menu. The chart below lists the available 3 Dot options and the pages where they appear followed by the definition for each. Some options are only available or enabled depending on the status of the account or ClareOne panel.

Move Out Customer
Available when the account is “Occupied”. Initiates Move Out Wizard which, when executed, walks the user through the following:
- Remove Mobile App Users
- Remove Emergency Contacts
- Remove Customer
- Remove Actions
- Remove and Reset Security PINs
- Clear Panel Activity Log
- Remove and Reset Door Lock Codes
- Create Z-Wave Thermostat Setpoints
Move In Customer
Available when the account is “Vacant”. Initiates Move In Wizard which, when executed, walks the user through the following:
- Remove and Reset Security PINs
- Remove and Reset Door Lock Codes
- Add Primary Customer
- Add Emergency Contacts
- Create Z-Wave Thermostat(s) Schedules
- Send New Customer App Invite
Change Primary Customer
Initiates the process to convert the current primary customer to a standard Mobile App User and prompts the user to insert the new Primary Customer information and send an invitation.
Change Company
Enabled when a sub-company exists and is accessible by the current user. When executed, the current account is moved to the selected sub-company.
NOTE: This process will deactivate any Central Station monitoring and must be reconfigured for the new account. It does not change the selected service plan.
Restart Controller
Restarts the connected controller. Controller must be online in FusionPro to be able to complete the action.
Backup Controller
Initiates a backup of the connected controller database. Backup includes all programmed ClareOne sensors and Z-Wave devices regardless of their status. The controller must be online in FusionPro to be able to complete the action. Backup is associated with the specific account and is stored in the FusionPro cloud. A maximum of four backups are stored and are referenced by their backup date.
NOTE: Backups are not automatic and should be created at the end of each account editing session.
Restore Controller
Restores a controller backup from the up to four backups created by installers or administrators. Can be used to backup an older version of the database as needed or to move the controller database to a new controller attached to the account.
Replace Controller
Initiates the Replace Controller wizard and walks the user through the following:
- Prepare New Panel instructions
- Backup Panel
- Disable LTE (if enabled)
- Disable Monitoring Services (if configured)
- Exchange Panel
- Add New Panel Information
- Enable LTE (Optional)
- Restore From Previous Backup
- Enable Monitoring Services
- Check Device Status
Remove Z-Wave Siren
Initiates the process to remove attached Z-Wave sirens.
Remove Z-Wave
Initiates the process to remove attached Z-Wave automation devices.
Home
This is the landing page users see after they log in to FusionPro. It is a live dashboard with a summary of Accounts and Service Plan information. The Home page also hosts Dealer News, the Clare Controls RSS feed. This feed contains the latest news, updates, and important notices.

Title Bar
The Home page Title Bar includes the following:
- The name of the person using this instance of FusionPro.
- A button to quickly jump to the Create New Account wizard.
- A free text search box to quickly search for accounts. Entering text here, then clicking the arrow or pressing enter will jump to the Account page with all records that have the text entered in the search.
Navigation Side Bar
Provide quick access to the various management areas in FusionPro
Account Summary
The Account Summary section lists the total number of accounts for the partner, including all accounts for all sub-companies, and quick filter links to the accounts list. This section summarizes the total number of accounts according to their FusionPro account status of Offline, Unconfigured, and Online accounts. Clicking on any of the items quickly displays the account list filtered by the selected option.
Paid Service Plan Summary
The Paid Service Plan Summary lists the total number of accounts for which there is a paid service fee and itemizes them according to Service Plan. Accounts with a Basic service plans are not included in the total number of Paid Service Plans but are on the itemization by plan. Clicking on any of the plans (Interactive Plus LTE, Interactive Plus, Interactive, and Basic) quickly displays the account list filtered by the selected option.
RSS Feed
This feed contains the latest news, updates, and important notices.
Accounts
Lists all accounts owned and managed by your company and, depending on the current user’s role, all accounts for any sub-companies as well.

Title Bar
Includes the following:
- Displays number of accounts for the selected filters.
- Dropdown to choose which company or sub-company to filter on.
- Create Account button to launch the Create Account Wizard.
Slide-out Menu
Includes summary information, username, filtered company name, and quick filter selections boxes for account Status, Service Plans, and Occupancy. Note that the quick filter selections are “and” filters. If the status Online is selected, all accounts which are Online will be listed in the Account List Box. If Online and Interactive Plus are both selected, only accounts that meet both criteria are listed.
Account List Customization and Exporting
The account list view can be customized by each user for their specific needs, or it can be customized for all users. Multiple account list views can be customized and saved. Click the “Edit” text next to the View name to customize the account list view to suit your needs.

Use the pop-over window to select the columns you want displayed and move them up or down to display in a specific order.

- Click and drag items from the Available Columns list to the list on the right.
- Click and drag an item in the right column up or down to set the order it appears in the list.
- Give the view a new Group Name.
- Check the Default View box if you want the list to be your default view.
- Set the visibility to Only Me or Entire Company.
- Click Save New to create a new list view.
The customized list view can be exported to a .csv file, by clicking Export Accounts on the bottom of the Slide-out menu. All filtered accounts and columns in the list are exported to the Accounts.csv file according to your browser settings.
Companies
Companies are divided into two categories: Parent and Sub-companies.

Parent Company
The Parent company was created when your company submitted their partner application. One company admin user was created and invited to collaborate in FusionPro when the account was created. That company admin must add new Staff to the company. An invitation is sent to each new staff member upon saving them in the Staff tab on the Manage Company page.
Click on the Manage Company button to get access to the Parent company settings and management. This page is for managing each of the following.
- Basic Company Info, where your Customer Support Contact is configured.
- Staff management, where you add or remove FusionPro users.
- Company Settings, detailed below.
- Dealer Lockout, where you can configure a lock out screen on the ClareOne panel. Particularly useful in builder installations where the panel might be installed before the dwelling is occupied. It can provide information on how the new homeowner or resident can contact you to complete their installation and turnover.

Company Info
General information about the Customer Support, Billing and Shipping contacts is entered here. Only Customer Support Contact information is required.
Staff
Accessible only to Company Admins, all FusionPro users are managed here. Click the Add Staff button to add new FusionPro users and assign their permission. Users are sent an email with an invitation to collaborate in FusionPro upon saving their info on the Add Staff page. Once they have completed their registration, “Yes” will appear next to each staff member’s name under the “Created Login” column on the Staff List page.

Company Settings
The sections under company settings are configured and are accessible for application on all your accounts.
Central Stations
Configure your Central Monitoring Station (CMS and CS or Central Stations are synonymous) communication settings for application on each account. The settings defined here are provided by the CMS to which your customer systems will send their alarms. Once it is configured and tested you will assign the CMS communication path to each of your ClareOne accounts. Detailed information and instructions regarding Central Stations are discussed in Configuring Central Stations.
Two-Way Calling Number
The ClareOne can make an outbound Two-Way voice call to the CMS provided the CMS can support it. A voice number for this specific purpose is provided by your CMS and entered here. It can then be assigned to the accounts with the appropriate Service Plans.
Home Builders
Create a list of builders for whom your company installs ClareOne panels then add the name of a builder on that list to the ClareOne account information. You can add the builder column to your accounts list view to sort or filter on and include in an account export.
Community
Create a list of communities where you install ClareOne panels then add the name of community where the ClareOne is installed account information. You can add the Community column to your accounts list view to sort or filter on and include in an account export.
Building Type
Create a list of building types in which you install ClareOne panels, such as Multi Dwelling Unit, Single Family Home, etc. Then label the ClareOne account accordingly. You can add the Building Type column to your accounts list view to sort or filter to include in an account export.
Dealer Lockout
Company Admins can create multiple lockout screens which can be pushed to ClareOne panels to lock them out, preventing use of the ClareOne UI. Use cases might include locking out a panel for billing purposes, or to provide partner contact information for new homeowner. Multiple screens can be created or uploaded, then selected and pushed under the ClareOne device settings.
NOTE: The ClareOne panel cannot be locked out while actively armed.
Select Create/Upload to add a new lockout screen
 Follow the instructions to create a new lockout screen


Preview the new lockout screen.

Close the preview, then give the screen a name and click "Done". Repeat for each use case you may have. Then select the screen an push it by going to the ClareOne page and selecting Dealer Lockout.


Sub-Companies
In some instances, you may want to assign accounts and staff members to a sub-company. When this is true click on the Add Sub-Company button. Follow the prompts to create the sub-company, then click on the sub-company in the company list to edit the sub-company settings and add staff.
Sub-companies are typically created when you need to subdivide your business, or your accounts based on their location or business relationship. For example, your company may install systems in apartment communities, therefore you may want to create a sub-company for the community to easily manage and group the associated accounts.
Staff members of the sub-company can access accounts only under that sub-company or sub-companies created under the sub-company. They do not have access to accounts under the parent company or other sub-companies under the parent company.
Configuring Central Stations
Central Stations are usually configured only once. A unique Central Station configuration is required for each Central Monitoring Station with which your company has a relationship.
Alarm Processing
All alarms sent by a ClareOne panel are delivered to our Alarm Relay Partner (Alula) via IP. Alula’s alarm processing center then forwards the alarm to the CMS according to the communication path you configured and assigned to your ClareOne accounts.
Alarms sent from Alula to your CMS are delivered using Ademco ContactID format and alarm codes using one of the following delivery methods.
- Sur-Gard III – Alarms are delivered from the ClareOne to Alula’s alarm processing center using Alula’s proprietary API and then forwarded to the assigned CMS to a Sur-Gard III receiver connected to Alula. This process is completed from end to end over IP and ordinarily takes just a few seconds to be received and responded to at the CMS.
- Stages XML – Alarms are delivered from the ClareOne to Alula’s alarm processing center using Alula’s proprietary API and then forwarded to the assigned CMS via a predesignated URL. This process is completed from end to end over IP and ordinarily takes just a few seconds to be received and responded to at the CMS. There are two Stages XML options:
- Generic Stages XML – Partners need to obtain URL, username and password from CMS
- Rapid Response – for use by partners who utilize Rapid Response CMS for their alarm monitoring. Unlike generic Stages XML, all connection information is prepopulated in FusionPro. Only the unique DNIS information is needed to program this connection.
- POTs (Plain Old Telephone Service) – Alarms are delivered from the ClareOne to Alula’s alarm processing center using Alula’s proprietary API and then forwarded to the assigned CMS using telephone lines. The alarm delivery Calling Line ID will be that of one of the Alula dialers, it does not represent the ClareOne or customer account in any way.
NOTE: Partners must contact their CMS to acquire the communication path information before they can configure their CMS in FusionPro. More information about how to get this information and supported Central Stations can be found here.
Central Station Configuration
- Select Companies, then click on the Manage Company button.
- Click on Company Settings then Central Stations to add and configure your CMS communication.
- Click the Add Central Stations button to open the Add Central Station dialog.

- Enter the Name of your central station.
- Click on the Add Communication Path 1 button
- Select the Communication Type from the pull-down options.
- SurGuard IP protocol as used by the ClareOne is defined here.
- Stages XML is another protocol used by many central stations using Bold.
- Rapid Response is also Stages XML protocol but already configured according to Rapid Response's connection paths. Each destination URL is already configured and does not require manual entry as is needed for generic Stages XML.

SurGuard IP

- Enter the IP address provided by your CMS.
- Enter the DNIS entered by your CMS.
NOTE: The DNIS may be provided in the form of line and receiver number (RRLLL), where the receiver number (RR) must be 2 digits and the line number (LLL) must be 3 digits. If shorter than required, pad them with leading zeros to meet the requirement. - Click the Save button to save the settings for Communication Path 1.
- Repeat for IP Comm Path 2 if your CMS provides a backup communication path.
- Click the Standard Phone Line if your CMS uses a phone path for back up or if it is the only method of delivery, enter the provided phone number.
NOTE: This is usually NOT a published number and may vary by account. It must be an Alarm Receiver phone Number provided by your CMS support team. - Click Save. The CS information you entered will be displayed on the Central Stations page with the status of the configured Communication Paths.
Stages XML

- Enter the username provided by your CMS.
- Enter the password provided by your CMS.
- Enter the Receiver Path provided by your CMS. The Receiver Path must be in the form of a complete URL including "HTTPS://". You will be unable to save the entry if a complete URL is not entered.
- Enter the DNIS entered by your CMS.
NOTE: The DNIS may be provided in the form of line and receiver number (RRLLL), where the receiver number (RR) must be 2 digits and the line number (LLL) must be 3 digits. If shorter than required, pad them with leading zeros to meet the requirement. - Click the Save button to save the settings for Communication Path 1.
- Repeat for IP Comm Path 2 if your CMS provides a backup communication path.
- Click the Standard Phone Line if your CMS uses a phone path for back up or if it is the only method of delivery, enter the provided phone number.
NOTE: This is usually NOT a published number and may vary by account. It must be an Alarm Receiver phone Number provided by your CMS support team. - Click Save. The CS information you entered will be displayed on the Central Stations page with the status of the configured Communication Paths.
Rapid Response (RRMS - Stages XML for Rapid Response Only)
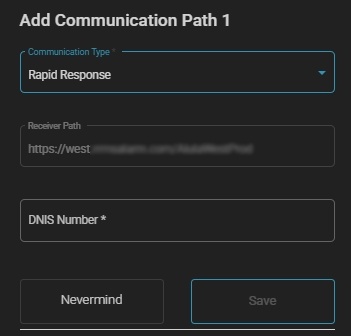
- Only the DNS is required to complete Stages XML to Rapid Response. All other required entries are already configured. Enter the DNIS provided by your Rapid Response.
NOTE: The DNIS may be provided in the form of line and receiver number (RRLLL), where the receiver number (RR) must be 2 digits and the line number (LLL) must be 3 digits. If shorter than required, pad them with leading zeros to meet the requirement. - Click the Save button to save the settings for Communication Path 1.
- Repeat for IP Comm Path 2 if your CMS provides a backup communication path.
- Click the Standard Phone Line if your CMS uses a phone path for back up or if it is the only method of delivery, enter the provided phone number.
NOTE: This is usually NOT a published number and may vary by account. It must be an Alarm Receiver phone Number provided by your CMS support team. - Click Save. The CS information you entered will be displayed on the Central Stations page with the status of the configured Communication Paths.
Central Station Status
If the communication path is valid and properly providing heartbeats to the Alarm Relay at Alula, an Online status is provided in the related IP Path Status column.
In some instances, the CMS will only have one IP path connected at a time and will connect the backup only when necessary. In this case, “unknown” is provided in the related IP Path Status.
Phone Status will always be unknown as this is not a real-time connection and is only “online” when an alarm is actively being relayed.
Testing the Central Station Connection
A configured account is required to send a test signal to the CMS. This process is performed in the ClareOne device settings and is unique for each account. Refer to Periodic Test Settings for specific instructions on sending a test signal.
Associating an Account with the Central Station
Refer to setting up Monitoring Services for specific instructions on associating an account with a configured CMS.
Sharing Account Information with Central Station
Refer to Export Account for specific instructions.
Managing Accounts
Every ClareOne panel or legacy control system is added and managed as part of account management, users will first create the account then assign the ClareOne panel to it. FusionPro has several step-by-step processes built-in to help navigate installers and FusionPro managers through each process. The first is the Create New Account wizard.
Creating a New Account
New account creation can be initiated directly in FusionPro or when installing a ClareOne panel by scanning the QR code provided at the end of the ClareOne Set-up Wizard with your phone. The QR code provides a URL which can be copied into your web browser. The link opens FusionPro. When the installer logs in, the New Account wizard is opened and the ClareOne UUID, Serial, and LTE information are automatically populated.
Create Account Wizard
Users can open the Create Account Wizard from each of the following areas:
- Create Account option on the Side-bar menu.
- Create Account button on the home page Title Bar.
- Create Account button on the Accounts page.
- Pasting the URL from the QR code displayed at the end of the ClareOne Setup wizard.
Each step in the wizard must be completed before the next step is available to complete. The exceptions are:
- Step 2 “Primary Customer Information” – a check box to bypass customer information is provided when the customer information is not available to enter.
- Step 4 “Add Panel Information” – Click the “Skip” button to bypass the panel information when the information about the hardware to be installed is unknown until after the installer arrives at the installation location.
Step 1 “Company Details”
Assign a company to this account. Only the parent company is available to select if no sub-companies have been created. If the user creating the account is a staff member under a sub-company, then the sub-company is listed.
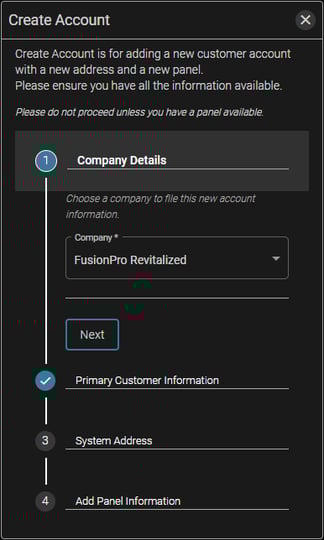
Click the Next button.
Step 2 “Primary Customer Information”
Enter the Primary Customer Information, Email, First Name, Last Name, and at least one phone number are required. Click the Add Phone Number button if more than one phone number is to be entered.
Alternatively, when the customer information is not available, click the checkbox when the customer information is not available to skip to the next step.
Click the Next button.
Step 3 – “System Address”
Enter the address where the ClareOne panel is to be installed. FusionPro searches for the address using Google Maps and can auto-complete address information if there is a match.
Click the Add Building Type, Builder, Community, or Notes button to add that information or notes about the account.

Click the Next button.
Step 4 – “Add Panel Information”
Enter the information to identify the ClareOne panel associated with this customer account. If you used the URL provided in the QR code from the ClareOne Set-up wizard, this information will already be populated.
The Test Connection button appears when the information is entered correctly. Click the button to ensure the ClareOne is communicating with FusionPro. Verify that the ClareOne has access to the internet if there are any issues with the connection test.
Click the Save Controller button after the information is entered and the connection test is complete.
Alternatively, click the Skip button when the panel information is not available to add. The account will appear as “Unconfigured” and “Vacant” if the Occupancy column is displayed on the account list view.
Managing an Existing Account
To view and manage an existing account, find it on the account list view, then click anywhere on the account in the list. The Slide-out menu displays with account focus on Summary page. The Slide-out menu provides quick access to all account management areas.
The account Title Bar provides information about the opened page and access to the 3-Dot menu. The 3-Dot menu is specific to the opened page, but some items are shared across multiple 3-Dot menus.
Summary Page
Provides summary information for the current account and connected controller.
Connectivity
Displays the status of the connected controller and its network connections.
Account Information
Summarizes account information, including assigned service plan, date service plan was activated, occupancy status, and account number assigned by the partner/company.
Primary Customer
Displays the name, email, and phone number of Primary Customer. The Primary Customer is the only user in the ClareOne ecosystem allowed to add additional App users to the system. They do this in the ClareHome application.
System Information
Displays system information related to the controller.
Customer Info Page
Displays and provides ability to manage customer account information.
Primary Customer
Click the pencil icon to edit information about the Primary Customer. The email is not editable. To change the email, the Change Primary Customer action must be completed. Changing the Primary User will convert them to a Mobile App User and can be removed from the account under Mobile App Users.
Mobile App Users
List all Mobile App Users, including Primary User, and their sign-up status.
-
- Resend – Displayed until the user has completed their sign-up via the link sent to them when their user was created. Clicking Resend will send the user a new invitation to complete their sign-up.
- Remove – Displayed next to all users, except the Primary Customer. Click Remove to unassign the user from this account. Connections to other accounts remain valid.
Address
Displays the address assigned to the account. Click the pencil icon to edit the address.
-
- Directions box – prints on the Export Account report provided to the Central Monitoring Station to assist first responders in locating the address.
- Send Coordinates Button – sends the Geo Coordinates to the controller. The coordinates are used when creating schedules relative to sunset and sunrise.
Municipality Contacts
Enter the local phone numbers for Police, Fire, and Auxiliary. This information is printed in the Export Account report provided to the Central Monitoring Station.
Emergency Contacts
Enter each Emergency contact used by the Central Station when calling to confirm an alarm event. This information is printed in the Export Account report provided to the Central Monitoring Station.
Check the ECV box if Enhanced Call Verification is requested by the homeowner. ECV requires the alarm monitoring company to place at least two phone calls to the customer to verify the alarm before they can dispatch the authorities.
ClareOne
Displays all settings applicable to the ClareOne panel and is not displayed for Cliq.Mini and Cliq.Host legacy controllers. This page is separated into four sections, each for managing different aspects of the ClareOne and associated security devices including Z-Wave and Sonos as a Siren.
ClareOne Management
Provides access to all settings specific to the ClareOne panel.

ClareOne Device Settings

|
Exit Delay |
|
|
Standard Entry Delay |
|
|
Long Entry Delay |
|
|
Transmission Delay |
|
|
Swinger Shutdown |
|
|
Secure Arming |
|
|
Cross Zoning |
|
|
Chime |
|
|
Voice |
|
|
Auto Updates |
|
|
Alarm Cancel Annunciation |
|
|
Tamper Enable |
|
|
Auto Arm Stay |
|
Master PIN Reset
The ClareOne Master PIN can be reset in FusionPro by Company Admins. This action is limited to Company Admins to protect the ClareOne account holder. Furthermore, the Master PIN is not displayed for the same reason. Enter the new Master PIN, then Confirm the new Master PIN and click the Save button. An email is sent to the primary user listed on the account to let them know that the ClareOne Master PIN has been reset by their installer.
NOTE: Clare support technicians will not reset the Master PIN and will always defer to your Company Admin.

Installer PIN Reset
The ClareOne Installer PIN can be reset in FusionPro by Company Admins. The installer PIN is not masked so that Company Admins can share the existing PIN with on-site installers without requiring a PIN reset. In the event the PIN does need to be reset, enter a new Installer PIN, then Confirm the new Installer PIN and click the Save button.

Periodic Test Settings
Installers can use this section to configure the interval at which the ClareOne will send a periodic test signal to the CMS. This section includes the date and time of the last and next test signals. A 602 code is sent for the periodic test.
Installers can also send a force signal to the CMS by clicking the Send a Test Message button. When clicked, the ClareOne sends an alarm 601 code to the CMS via our Alarm Relay Partner, Alula. Note that Alula will forward only one test signal per 10-minute interval. All other tests are suppressed until the time window expires. Refer to the Communication Log for a status of the event.

Dealer Lockout Screen
Provides a method by which partners can lockout the ClareOne UI and display specific messaging.
NOTE: The ClareOne panel cannot be locked out while actively armed.

If no lockout screens have been created users are prompted to create one by clicking on the Configure Now button. This operation may be restricted depending on the user type.

Click on Dealer Lockout Screen button to expand, then click choose screen.
 Select and preview then click apply to push the screen to the ClareOne.
 A toggle is display when selecting Dealer Lockout Screen with an active lockout. Toggle off to deactivate the lockout.

Security Zones

This section lists all attached security sensors with the following information in the table:
- Name – assigned name of sensor when sensor was added
- Type – the type of sensor. This is not configurable for ClareOne wireless sensors. However, the way the sensor operates can be defined with Zone Profiles.
- Sensor serial number
- Zone number – the Zone number is assigned to the sensor when it is added to the ClareOne panel. Zone numbers are assigned in sequence and are not configurable. If a zone is removed, the next sensor added will take the vacant zone number. If, for example, Zone 3 is deleted, the next sensor added to the ClareOne is assigned to Zone 3.
- Low Battery – indicates if the sensor has reported a low battery condition to the ClareOne.
- Status – indicates the current status of the sensor.
- Signal Strength – indicates the strength of the radio signal of the sensor when communicating with the ClareOne. For optimum performance, the signal strength should be 3 bars or higher. Installers should consider adding a wireless repeater when signal strength is 2 bars or lower.
- The sensor table can be sorted by any of the listed columns by clicking on the column header.
Adding Sensors
Sensors can be added and managed from FusionPro. Click the Add Sensor button to add a new sensor and follow the on-screen prompts.
Managing or Configuring Sensors
ClareOne wireless sensors can be configured from the FusionPro by clicking on the row of the target sensor, then modifying the sensor on the Sensor Info dialog box. Items that can be changed are the Sensor Name and the assigned profile. Unless customized, the sensor behaves according to the assigned profile.

Sensor configuration and functionality may be customized by modifying the Basic and/or Advanced settings. Note that selecting a different profile may achieve the desired results without customizing the settings. Please refer to the ClareOne Zone Profiles Tech Bulletin and Zone Profiles Table for specific information about zone settings and profiles.
Fobs
ClareOne Fobs and Panic Pendants are displayed separately from security sensors. They do, however, use a zone on the ClareOne panel and are assigned the zone number in sequence with security sensors.
External Sirens
Refer to the article about ClareOne Wired Siren Integration for information about how to configure a wired siren. Wired sirens are not liste on the External Siren list.

- Z-Wave sirens and all attached Sonos speakers are listed in this section.
- Z-Wave sirens are not customizable.
- Sonos speakers can be used as a siren but have to be configured. Click on a Sonos speaker in the list and select the desired siren settings.

Service Plans
Service Plans allow you to select the level of service the ClareOne provides for your customer. A complete description of what’s available in each service plan is located here. Contact your sales rep for specific service plan pricing.
Central Station monitoring is available only when the selected Service Plan is Interactive Plus or Interactive Plus LTE.

Security Panel Info
Provides the status of the connection between the ClareOne panel and our Alarm Relay Partner, Alula. Please refer to the section Configuring Central Stations for information about determining the connection status to your CMS.
Cellular Account
Displays only when the selected Service Plan is Interactive Plus LTE. ClareOne panels are preloaded with a Verizon or AT&T SIM card when they are shipped. You can determine which SIM card is installed by the ClareOne model number printed on the label on the back of the ClareOne panel.
-
- CLR-C1-PNL1 – Verizon SIM (Does not work outside the United States)
- CLR-C1-PNL1-A – AT&T SIM (Works in the United States AND Canada)
LTE must be activated on the ClareOne before it will communicate via the cellular provider.
NOTE: Ensure that ClareOne panel is 100% current on updates before trying to activate LTE.
Two-Way Calling
The number this account uses for two-way calling to your Central Station, if your Central Station supports two-way calling. Refer to the section Configuring Central Stations for information.
Monitoring Services
Assign the specific Central Monitoring Station (CMS) and CMS Account Number to which this device will send the alarm information when an alarm is triggered. Before this can be set-up, you must have configured a CMS under your company settings.

-
- Central Station (Required)
Drop down list of CMSs configured in Company Settings. Refer to the section Configuring Central Stations for help if nothing is listed.
-
- Caller ID Phone Number
Not required but is pre-populated with the Caller ID of the Verizon LTE Module if activated. AT&T SIMs do not provide a number. The Caller ID number is informational only and is not required to send an alarm to the CMS, nor is it included in the alarm data packet.
-
- CS Account Number (Required)
The last four digits of the account number assigned to this account in your CMS. This account number is provided in the alarm packet sent.
-
- CS Auxilliary Number
Not used by ClareOne.
-
- Serial Number (Required)
This is pre-populated if the ClareOne is current on firmware and properly configured.
-
- Do not send Arm/Disarm checkbox
Checked by default, this prevents Arm or Disarm events from forwarding to your CMS. These events are sent to our Alarm Relay Partner, Alula, but are suppressed and not forwarded to the CMS. This ensures the information about arming and disarming is still available in the Communication Logs and prevents additional per event charges from the CMS.
Devices
The ClareOne supports a large variety of home automation devices, including lighting, access control (door locks and garage door openers), surveillance cameras, and Sonos and Heos streaming music speakers. You can find a more comprehensive list of supported devices here.
Some supported devices are DIY and can be added by the homeowner using the ClareHome application. All supported devices can be added via FusionPro on the Devices page. The devices page lists all connected devices and their status. The exception are devices that do not have a user interface, like Z-Wave motion sensors or repeaters. However, most of these devices can be used as triggers for Actions.

- Title Bar – Displays the count of all connected devices and the Add Device Button.
- Quick Filters – Filter for Online, Offline, or Unconfigured devices.
- Search bar – Find devices by free form text matches on the Name, Type, and Area columns.
- Sortable – Click on any column header to sort the column. Click again to change the sort order.
- Checkbox – Mark a device and choose an action for that device. Attempting to delete a Z-Wave device prompts the user to initiate the Z-Wave removal process.
Adding Devices
Click the Add Device button to add a new device to the ClareOne. Select the device category from the displayed list and follow the prompts. Refer to the Supported Device List for additional information about what devices can be added to the ClareOne.
Some devices, especially cloud-based devices such as thermostats and garage door openers, require user authentication with their respective cloud service. Make sure you have the required credentials before trying to add such devices.

Activity Log
Displays activities related to “Doors, Locks and Gates” and “Security” on the ClareOne. The list is filtered to the last 7 days with up to 200 total events when initially opened. Use text search or filters to further define which events to list.
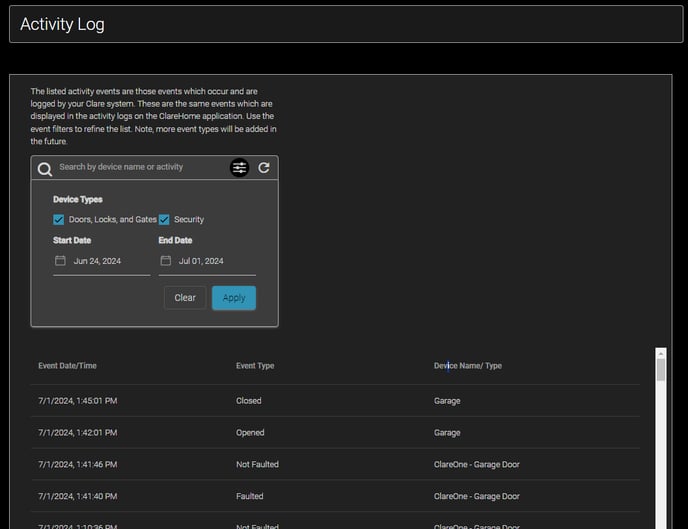
Filter Options
-
- Search bar: Search Event Type and Device Name/Type columns for specific text.
- Check boxes to quickly filter between “Doors, Locks and Gates” and/or “Security”. Both are checked by default.
- Date pickers to choose the start and end dates of events to be displayed.
Actions
Actions are Automations, Schedules, and Notifications created in the ClareHome application by the users. Those actions are also accessible and manageable in FusionPro on behalf of the ClareOne User.

- The Actions table is sortable by any column header
- Check the box next to any action to delete it
- Click on any action in the list to edit it
- Click the Add Action button to create a new action

- Select the action trigger, “When This Happens”
- A Scene Tile is Pressed – creates a scene automation that is triggered by adding a tile to the ClareOne UI and/or the ClareHome application. These Actions can also be called upon by other actions.
- A Time of Day Passed – creates schedule action that is triggered based on a schedule. Schedules are flexible in that they can be run on specific days of the week at specific times or relative to sunrise or sunset. They can be set to run for a specific period or forever.
- A Device Action Occurs – creates an action automation that runs based on the operation of another device. For example, “turn on my front porch light when my gate is opened”.
- Select the “Do This” – defines what happens based on the trigger configured in When this happens.
- When editing an existing action, tap the 3 Dot icon on any item listed in the action to edit that item.
Maintenance
Provides a quick glance at the status of security sensors and connected Z-Wave devices, including additional details about each Z-Wave device. Operations such as Backup, Restore, or Replace controller are located on the 3-Dot menu.


Communication Log
Log which lists all events forwarded to our Alarm Relay Partner, Alula, and the status of the relay. The displayed events are automatically filtered for the previous seven days, but can be filtered by different date windows, Relay Status, Event Code and/or Zone/User Number. This log can also be downloaded into a CSV file to share with others.
NOTE: Any event which displays Relay Completed has been sent to and received by the CMS according to the CMS settings. In instances where the CMS indicates that the event was not received the issue is usually a configuration problem. In these cases, it is best to double check with your CMS that you have both the correct DNIS (RRLLL) number and account number programmed.

Notes
An area used to store specific information for all who maintain the account to see. Perhaps a CRM Account number for cross reference. It is best to NEVER put private or security information in the notes. I.e. a gate code or security PIN.
Additional Menu Items
Located at the bottom of the Slide-out menu on the Account page.

Export Account
Account report to be shared with the CMS. It provides all the important contact, municipality, and zone information the CMS needs to enter in their system and cross reference when an alarm event is received from the ClareOne.
Legacy Fusion
Opens Legacy Fusion to manage legacy Cliq.Mini and Cliq.Host devices.
Open OvrC
Self-Explanatory
Central Station Monitoring – Bringing it all together
There are multiple settings and configurations required to enable and set up alarm delivery and then test alarm delivery to a Central Monitoring Station (CMS). These are configured in different areas in FusionPro and are referenced in various areas throughout this user guide. This section is intended to combine all those steps into one contiguous guide with cross references to each of the different sections.
- Configure you’re your CMS, refer to each of the following for guidance.
- Create the account, refer to Creating a New Account.
- Add and configure all security sensors to the ClareOne. This is ordinarily done in the ClareOne setup wizard. Refer to each of the following for more information about configuring security sensors.
- Add all appropriate security info required by your CMS.
- Municipality Contacts – Should be included on the Account Report. Most CMSs will have this information in a database, but it should be provided in the Account Report for cross reference.
- Emergency Contacts – Required on the Account Report.
- Address – Should be included on the Account Report.
- Apply the correct Service Plan to the Account, refer to Service Plans.
- Configure the Account specific information to send to the CMS, refer to Monitoring Services.
- Send a test signal to the CMS and configure the Periodic Test Interval, refer to Periodic Test Settings.
- Verify test signals are related by our Alarm Relay Partner, refer to Communication Log.
- Put your ClareOne panel in test mode with your CMS and send test signals from all your configured zones. On the ClareOne panel:
- Open Installer Settings > System Test > Sensor Test.
- Toggle Sensor Alarm Delivery Test to On.
- Open or activate each sensor connected to the ClareOne panel.
- Return to the ClareOne panel and verify that all sensors were tripped and send the expected alarm code. Refer to ClareOne Zone Profiles Tech Bulletin for more information.
- Verify with the CMS or in your CMS portal that all the sensor test alarms were received.
Updated: 03/11/2025