Change Log
|
Revision |
Date |
Description |
|
01 |
5/1/2020 |
|
|
02 |
5/16/2020 |
|
|
03 |
6/18/2020 |
|
|
1.5.0 |
10/21/2020 |
|
|
1.5.1 |
11/01/2020 |
|
|
1.5.2 |
12/15/2020 |
|
|
1.5.3 |
03/18/2021 |
|
|
1.5.4 |
11/03/2021 |
|
|
1.5.5 |
01/14/2022 |
|
|
1.5.6 |
01/18/2022 |
|
|
1.5.7 |
06/08/2022 |
|
|
1.5.8 |
05/30/2023 |
|
|
16 |
05/30/2023 |
|
|
17 |
11/18/2023 |
Adding Support for Silent Arming |
Last Updated - 02/23/2024
Online Documentation
Manufacturer Website: http://www.clarecontrols.com/
Support Site: http://www.clarecontrols.com/contact
Full Documentation: http://www.clarecontrols.com/helpcenter
Introduction
ClareOne™ is the unified smart security and smart home control panel from Clare Controls. The ClareOne Panel integrates with Control4 to add easy-to-install security features into a Control4 system. The ClareOne panel and its attached security zones auto-discover in a Control4 project and this driver populates a rich set of security controls.
The ClareOne driver enables a two-way set of security controls (arm, disarm, emergency alarm triggering, zone status and zone bypass), and provides metadata feedback for the current panel state (if the panel is armed, alarmed, faulted, or in a troubled state).
- This driver requires Control OS 3.0.0 or later to operate.
- This driver requires that the ClareOne panel is on the same network as the Control4 system.
Installation
Only qualified installation technicians should install the ClareOne Panel and integrate it into a Control4 system. Follow the installation and programming instructions that came with your ClareOne equipment. Clare Controls does not assume responsibility for damages caused by improper installation, connection to the network, or use of the device.
SDDP Setup
Install, configure, and test the ClareOne panel and all connected sensors. The ClareOne driver supports communication within the Control4 system over WiFi and ethernet connection types. Verify that the ClareOne panel is fully functional and configured before integrating with Control4.
The ClareOne panel and system needs to be activated through the Clare back-end management platform, FusionPro™, in order to have security monitoring services enabled. All Control4 integrators authorized to sell ClareOne have been set up with FusionPro accounts. For full ClareOne panel installation and configuration, see ClareOne Wireless Security and Smart Home Panel User Manual (DOC ID 1871) .
To add the driver (SDDP):
- Access Composer and navigate to the Discovered tab
Composer > System Design > Discovered - Sort the list of discovered SDDP devices by Manufacturer.
The ClareOne panel is listed with:
Type: Security
Manufacturer: Clare Controls
Model: CLR-C1-PNL
Address field: clarecontrols:security-clarehome-MAC ADDRESS
Note: The MAC address uses all capital letters. - Double-click on the discovered ClareOne Panel to add it and its attached sensors to the project.
When the panel is added this way, it automatically configures itself.
That’s it, you are done with setup.
Proceed to testing the integration and custom programming.
Supported Features
Once the ClareOne panel is added to the project in Composer, the Control4 user interface displays ClareOne as the security subsystem and allows the Control4 system to control the ClareOne panel. The available Control4 security commands enabled by the ClareOne driver are listed below.
- Arm Stay: Allows Control4 to arm the ClareOne panel in Arm Stay mode. When the ClareOne panel is armed to Stay, any zone configured as Active in Stay in the ClareOne Sensor Management Settings will be armed.
- Arm Away: Allows Control4 to arm the ClareOne panel in Arm Away mode. When the ClareOne panel is armed to Away any zone configured as Active in Away in the ClareOne Sensor Management Settings will be armed.
Note: When arming to Away without opening a zone, the ClareOne panel will arm in Stay mode. This is called Auto Armed Stay. This option can be disabled on the ClareOne panel under User Settings > Security & Arming > Auto Armed Stay.
- Instant Stay: Allows Control4 to arm the ClareOne panel to Armed Stay mode Instantly with no delay.
Note: When using this option there is no entry delay. If an entry zone is tripped, the ClareOne will enter an intrusion alarm condition.
- Silent Arming: Allows Control4 to Silently arm the panel in each of the following modes: Stay, Away, and Instant Stay.
- Secure Arming: Allows the ClareOne panel to require a user PIN code when arming the system. Secure Arming is disabled by default and can be enabled by navigating to Settings > User Settings > Security & Arming. When Secure Arming is enabled the Control4 system prompts the user for a PIN code.
Note: Regardless of the Secure Arming state (enabled/disabled), the user is always prompted for a PIN when arming the system with open zones (Auto Zone Bypass).
- Disarm: Allows Control4 to disarm the ClareOne panel.
- Remote Arming / Disarming Support – With an active 4sight subscription, users can access their ClareOne system remotely. The ClareOne panel supports remote arming and disarming through Control4. The integrator has the option to disable remote disarming in Composer Pro.
- Security Sensor States: Sensor states can be used for Automation Events in Control4.
- Zone Status: Supports real-time zone status updates, even when the ClareOne panel is Disarmed. Zones and their names are automatically imported and show real-time status in Control4. Automations can be built inside Control4 triggered by ClareOne events.
Note: The active in arm states of non-Environmental ClareOne sensors can be set for Away and Stay individually. When a sensor is ignored in a particular arm state the sensor will still report its status in real-time but will not trigger an alarm event. This setting can be accessed from the ClareOne panel by selecting User Settings > Sensor Management then select the pencil icon next to a particular sensor. The Control4 integrator can take advantage of this feature with custom programming to trigger activities.
Auto Zone Bypass: Allows Control4 to prompt the user with all open zones and allows for auto bypassing with confirmation from the user.
Note: The user’s PIN will be required when auto bypassing sensors, whether Secure Arming is enabled or disabled.
- Emergency: Allows Control4 to set an Emergency condition on the ClareOne panel.
Warning: The Control4 user has the ability to trigger a Panic or an Emergency condition remotely. The alarm call center will act and respond the same as if triggered locally.
- Fire: Alerts the central station to a fire panic.
- Panic: Alerts the central station that police are needed.
- Police: Calls the monitored alarm station and allows for two-way voice communication (two-way communication is not available for silent panic).
- Auxiliary (Medical): Calls the monitored alarm station and allows for two-way voice communication (two-way communication is not available for silent panic).
- Trouble Conditions: Allows Control4 to display the ClareOne panel’s trouble conditions.
- Panel tamper: The panel’s tamper has been activated.
- Missing battery: There is no battery detected/installed.
- Panel low battery: The panel’s battery charge is low.
- Panel on battery: The only panel power is provided by the battery.
- Supervisory trouble: The panel lost connection to the central station.
- Ethernet trouble: Ethernet or WiFi connection is lost.
- Auto configuration and zone importing: All zones are automatically added with their set names. New zones are added when the ClareOne panel is updated.
Note: A dealer may need to refresh the Control4 Navigator when new zones are added.
- Zones / Users: The ClareOne Panel supports up to 128 sensor zones and 99 users. The ClareOne Duress user pin code cannot be used to disarm the panel through Control4.
- Entry / Exit Delay Countdown: The number of seconds remaining in the exit or entry process. The countdown timer will be shown in the Control4 apps and on T3/T4 Series Touch Screens.
- SDDP: Supports SDDP discovery over WiFi or Ethernet connections.
Supported Features using the T3/T4 Series Touch Screen
When using a T3/T4 Series Touch Screen the ClareOne panel(s) must be enabled to show on each touch screen device individually. Navigate to the Security Partition device in Composer Pro and click on the “Set UI Associations” button. Select Show Panel, Entry/Exit Chime, and Panel Chime to take advantage of all ClareOne features below.
/Image%20001.png?width=679&name=Image%20001.png)
The following feature are supported by the ClareOne panel when using T3/T4 Series Touch Screens:
Chime on Entry Delay and Exit Delay
To enable the delay chimes on your T3/T4 touch screen tap on your security panel device, then Settings, and select “Chime on entry/exit delay”.
Chime on Zone OpenTo enable the Chime on Zone Open for a certain zone, in Composer Pro navigate to the Security Panel Zone Properties, double click on a zone, select the Chimes box, select Save, and refresh the Navigators.
/Image%20002.png?width=608&name=Image%20002.png)
Emergency Alarms can be triggered from the T3/T4 Touch Screen. To trigger an Emergency, open the Security Partition, then tap the Emergency icon on the left, select your Emergency type, then tap Send to confirm.
/Image%20003.png?width=613&name=Image%20003.png)
Real time zone status
Under the Zones section of the Security Partition, each Zone Name, Status, and Type is displayed automatically, in real time. /Image%20004.png?width=613&height=319&name=Image%20004.png)
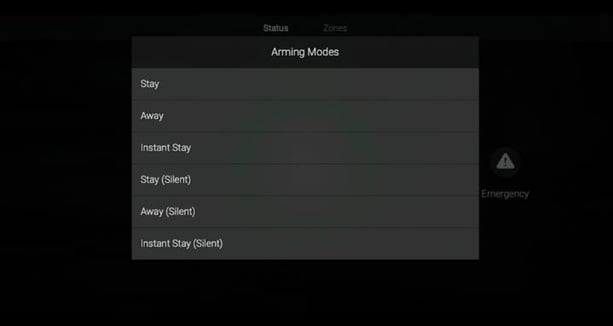
Arming to Away, Stay, or Instant Stay with or without a pin.
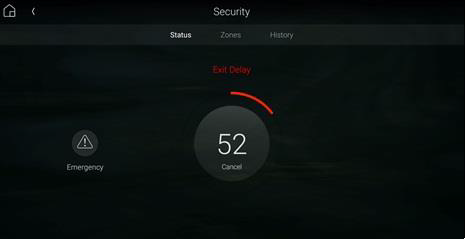
When arming the ClareOne panel from a T3/T4 Touch Screen or mobile app you are presented with 6 options, Stay, Away, and Instant Stay, Stay (Silent), Away (Silent), and Instant Stay (Silent). When Secure Arming is enabled the user will be required to enter their PIN, then ClareOne will immediately start the arming process.
When the ClareOne panel is in Entry or Exit Delay, the countdown timer will display on T3/T4 Series Touch Screens and the Control4 mobile applications.
Disarming the panel
he ClareOne panel can be disarmed from a T3/T4 Touch Screen by tapping the red lock icon on the Security Partition or entry delay countdown timer and entering a PIN code.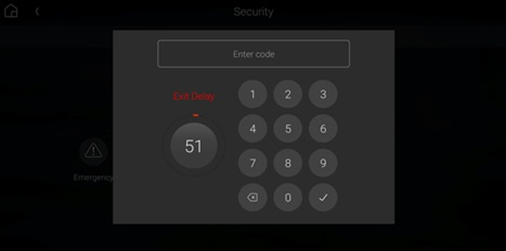
In the event an invalid pin is used to disarm the system the Control4 UI will display “Failed to Disarm Invalid Pin”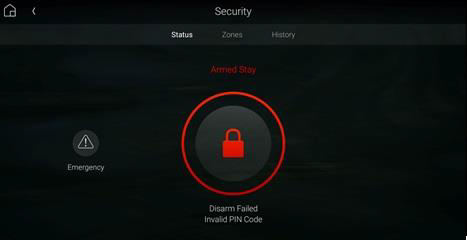
Auto Bypassing Open Zones.
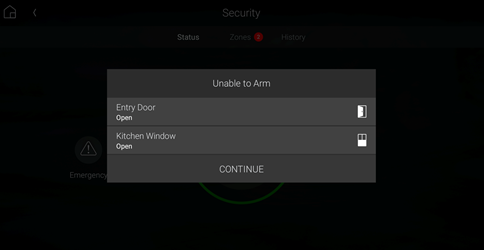
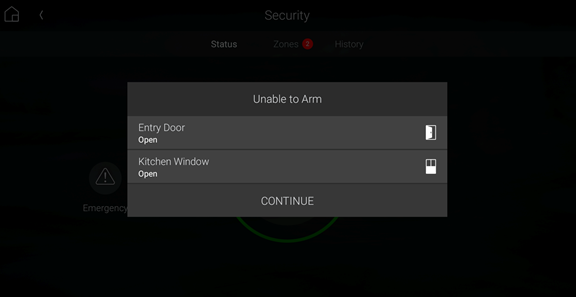
The ClareOne panel supports Auto Bypassing from a T3/T4 Touch Screen. When arming the ClareOne panel with open zones, the Control4 user interface will prompt the user with all open zones and request permission to continue.
Note: When Auto Bypassing the Control4 user interface will always prompt for a PIN code.
History of Partition and Zone events
- Control4 supports Partition and Zone History if enabled. To enable History, in Composer Pro navigate to Agents from the Go menu in the menu bar or the icon in the bottom left, click the Add button in the top left and select History from the list.
- Partition and Zone History can be viewed from the Security Partition. Open the Security Partition, then tap History. At the bottom the user can filter History by Event, Alert, and Alarm. Event, Alert, and Alarm history are shown in the order the event occurred.
/Image%20011.png?width=613&height=325&name=Image%20011.png)
- History Agent settings can be adjusted in Composer Pro to control how much history is shown on the touch screens and apps.
Multiple Partitions
A single ClareOne panel only supports a single security partition. To accomplish the effect of multiple partitions on a single project, you will need to dedicate one ClareOne panel for each partition.
The second ClareOne is added the same as the first panel. Please refer to the SDDP Setup section for instructions on how to add the second panel.
Once the second ClareOne panel is in your Control4 project, tap the “Set UI Associations” button under the partition device and enable “Show Panel” on any or all touchscreens. Refresh the Navigators and confirm the two ClareOne security partitions are functional on the touchscreens and apps associated with the Control4 project.
Note: When using Disarm in an action the “Default User Code” needs to be set under the partition device.
To create these actions the integrator would first create Actions under the primary security partition by choosing the security event “Arm Status Changed”. Next create logic on Current Arm Status = Armed | Stay and another for Armed | Away. When the logic condition is satisfied the security action would then be to send a command for Stay or Away to the secondary partition.
For the Disarm action, use the “Security Event Disarmed” on the primary panel, and the Disarm command for the secondary partition. Make sure to set a “Default User Code” for the secondary partition panel to successfully execute the disarm command.
Additional ClareOne panels and partitions are added following the above procedures.
Zone Auto Bypass
The ClareOne panel supports Auto Bypassing of any open zones. When arming the ClareOne panel to any arming state the Control4 UI will display any open zones and prompt the user for confirmation. Whether Secure Arming is enabled or disabled on the ClareOne panel the user will always be prompted to enter a PIN with auto bypassing.
Commands
The ClareOne Driver supports commands that can be used for custom programming.
- Arm Auto Bypass: Allows for programming to force arming of a ClareOne pane; regardless of any open zones. Any open zones will be automatically bypassed.
Supported Arm Types:- ARM_AWAY
- ARM_STAY
- INSTANT
- Zone Bypass: Allows for programming to bypass a specific zone.
- Zone Un-bypass: Allows for programming to un-bypass a specific zone.
Note: Arm Auto Bypass commands require the Default User Code to be set in Composer regardless of whether Secure Arming is enabled in the ClareOne Panel.
Properties
The ClareOne Driver properties available in Control4 include:
- Log Level: A list of set logging (for example: debug, trace, critical).
- Log Mode: Allows the user to select the desired logging mode.
1 – Printing
2 – Trace
3 – Printing and Trace
- Version: This is a read only field displaying the driver version.
Events
The ClareOne panel provides Events to the Control4 system that the integrator can create Control4 Actions against. The following events are supported in the ClareOne driver:
Trouble Start
The ClareOne panel will send Trouble Start event when any of the following panel trouble conditions are active.
Available Trouble Conditions
- Panel Tamper
- Missing Battery
- Panel Low Battery
- Panel On Battery
- Supervisory Trouble
- Ethernet Trouble
- Zone Low Battery
- Zone Loss Supervisory
- Zone Tamper
- Zone On Battery
- Zone Aux Power Draw
Example of Control4 Action programming for Trouble Start
/Image%20018.png?width=688&name=Image%20018.png)
- Trouble Clear – When a panel trouble condition is cleared the ClareOne panel will send a Trouble Clear event.
Example of Control4 Action programming for Trouble Clear
/Image%20019.png?width=688&name=Image%20019.png)
- Armed Status / Type - When the Armed status is changed, the ClareOne panel will send an Armed Status Changed event. The supported status change events are:
Available Armed Type
-
- Stay
- Away
- Alarmed
Example of Control4 Action programming for Armed Status Change
/Image%20020.png?width=688&name=Image%20020.png)
- Disarmed State – When the panel is disarmed, the ClareOne will send a Disarm event.
Example of Control4 Action programming for Disarmed State
/Image%20021.png?width=688&name=Image%20021.png)
- Alarm – When in an Alarm state, the ClareOne panel will send an Alarm event. This includes any environmental sensor alarms, such as Water, Heat, CO, and Smoke.
Available Alarm Types
-
- Burglary – This alarm type includes contact closure, motion, glass break, and shock sensors
- Smoke – This alarm type includes smoke sensors
- Fire – This alarm type includes heat rate of rise sensors
- Water Leakage – This alarm type includes flood sensors
- CO – This alarm type includes Carbon Monoxide sensors
Example of Control4 Action programming for Alarm
/Image%20029.png?width=687&name=Image%20029.png)
- Alarm Clear – When an Alarm is cleared, the ClareOne panel will send an Alarm Clear Event
Example of Control4 Action programming for Alarm Clear
/Image%20023.png?width=620&name=Image%20023.png)
- Partition State Changed – The ClareOne panel will send Partition State Changed events when any of the following panel states exist.
Available Partition States
-
- DISARMED_READY
- DISARMED_NOT_READY
- EXIT_DELAY
- ARMED
- ALARM
Example of Control4 Action Programming for Partition State Changed
/Image%20024.png?width=688&name=Image%20024.png)
- Delay Time Remaining – The ClareOne panel will send the time remaining during an entry or exit delay process.
Example of Control4 Action Programming for Delay Time Remaining
/Image%20025.png?width=662&name=Image%20025.png)
- Open Zone Count – The status of the number of opened zones. The ClareOne panel will send an Open Zone Count event with every zone status change.
Example of Control4 Action Programming for Open Zone Count
/Image%20026.png?width=688&name=Image%20026.png)
- Disarm Failed – The status of the failure to disarm the ClareOne panel when executed from the Control4 platform.
Example of Control4 Action Programming for Disarm Failed
/Image%20027.png?width=688&name=Image%20027.png)
- Emergency Triggered – the status event when an Emergency alarm condition is triggered on the ClareOne panel.
Available Emergency Types
-
- Police Panic
- Silent Police Panic
- Fire Panic
- Auxiliary Panic
Example of Control4 Action Programming for Emergency Triggered and an Action based on the type of Emergency Alarm.
/Image%20028.png?width=685&name=Image%20028.png)
/Image%20022.png?width=688&name=Image%20022.png)
Automation Examples
Example 1
In this example we will cover the scenario where the integrator would create Actions to turn on a garage light when motion is detected and automatically turn the light off when motion is not detected for a period of time. In this example we will be taking advantage of Control4’s timer agent. This example will assume the integrator already has the ClareOne panel and lighting devices added to the project.
First, we need add the timer agent and create a timer.
- Navigate to the Agents settings by selecting Agents from the Go menu in the menu bar, or clicking on the Agents icon in the bottom left of Composer Pro.
- If Timer is not listed, click Add, select Timer then click OK.
- Under Timers click the Add button, enter a name for your new timer and click create.
- On the right pane of the Agents screen you will see the options for the timer you just created. Update the Interval to an appropriate time. In this example we will use 10 minutes. After 10 minutes of no motion the garage light will shut off.
/Image%20030.png?width=643&name=Image%20030.png)
Now that we have a timer create let’s add a Motion Sensor device and make a connection to the appropriate zone on the panel.
- Under the System Design section navigate to the My Drivers section of Items.
- Under the Sensors category double click on the Motion Sensor option.
/Image%20031.png?width=688&name=Image%20031.png)
Composer Pro will add a Motion Sensor device to your room. - Next, navigate to the Connections sections and click on the newly added Motion Sensor, then click on the Contact Sensor line item in the right pane of Composer Pro.
- Click and drag the Contact Sensor to the zone device in the lower section.|
/Image%20032.png?width=688&name=Image%20032.png)
- Navigate back to the System Design section, select the Motion sensor device and test the motion sensor confirm that the state changes to open.
/Image%20033.png?width=688&name=Image%20033.png)
We now have our Timer setup and a Motion Sensor device to receive state changes. Let’s create some Actions.
- Under Actions select the Motion Sensor Device and then “When the Motion Sensor senses motion”.
- Under Device Actions select you timer you created, and the Timer is running option and drag the conditional into the Script section.
- Under Commands for your timer drag Restart Timer under the conditional from the previous step. We create this check to restart the timer to keep the light on as long as the Motion Sensor reports motion.
- Next add an Else condition to your Action by dragging the Else option into the Script window.
- Then add another timer conditional for if the timer is not running.
- Under this conditional drag in the command to Start your timer and the light turn on command.
/Image%20034.png?width=688&name=Image%20034.png)
- Lastly select Timer under Device Events, select your timer, then “When Timer expires.” Next drag in the Device Action to turn off the light.
/Image%20035.png?width=686&name=Image%20035.png)
To review. We have created a timer, setup a Motion Sensor device, mapped the sensor to a zone device on the ClareOne, and created an Action to turn on a light, and keep it on under our timer expires.
Example 2
In this example we will create an Action to automatically adjust the set point of a thermostat based on whether motion is present in a room. Please make note of the Timer, adding of a Motion Sensor and mapping of a Motion Sensor device to a physical ClareOne sensor concepts in the previous example.
In our example if the Motion Sensor detects motion, we would trigger an Action to lower the thermostat. The restart timer logic condition would restart the timer when motion is sensed. In this case the timer might be set for 30 mins or 1 hour. For our “When Motion Timer expires” action we would raise the thermostat after there was no motion sensed for the timer interval period.
/Image%20036.png?width=688&name=Image%20036.png)
Example 3
In this example the homeowner arrives home late. The exterior lights are on, the ClareOne panel is armed, and the interior lights are off. We could create an Action that would turn on an interior light when the ClareOne panel is in Entry Delay. This scenario provides both Security and Comfort to a homeowner.
Note: This example assumes the outside lights are set on a timer to automatically turn on in the evening.
In this example we would use the partition state change status and whether the outside lights are on. The Action would be to turn on an interior light.
/Image%20037.png?width=688&name=Image%20037.png)
Troubleshooting
- If the mobile user interface is not updating, refresh the project Navigator. Once refreshed, the mobile user interface updates and displays the correct status.
- If you have updated the driver and do not see the correct zone names, restart the main controller.
- IMPORTANT: Refresh Navigators, Refresh Project or restart of Composer will not resolve this.
Limitations
The ClareOne panel only supports one security partition per Control4 project. (However, multiple ClareOne panels can be attached to a Control4 project, each acting as a separate partition. Please refer to the Multiple Partitions section for more information.)
Arming the panel to Instant Stay with an exit delay is not supported.
The ClareOne driver does not support the addition of time in the exit delay during Arm Away.
Full PDF - ClareOne Panel Control4 Driver Integration Release Notes (DOC ID 1935)