Introduction
The Original Carrier Côr thermostat is a smart thermostat. The Côr has been tested and certified for integration with the ClareHome system.
Note: This integration only supports the Original Carrier Cor thermostat, not other thermostats in the Carrier Cor line.
By integrating the Original Carrier Côr thermostat to a ClareHome control system, your customers can send commands to the thermostat to change modes, cool and heat settings, and fan status from their mobile iOS devices or Android smartphones.
When integrating the Côr thermostat into your ClareHome project, no wires or extra connections are necessary. Install the Côr according to its documentation, and then connect it directly to Wi-Fi on the home network.
The Côr thermostat integrates with the ClareHome system in a way similar to the existing HVAC integrations. All HVAC integrations share a common UI, so that the user experience is consistent.
Temperature settings can be controlled via events. Use Fusion’s Scenes and Rules to automate the actions your customers want.
The Following figure shows the Côr controls on the ClareHome UI.
Figure 1: User interface of the Côr Wi-Fi thermostat
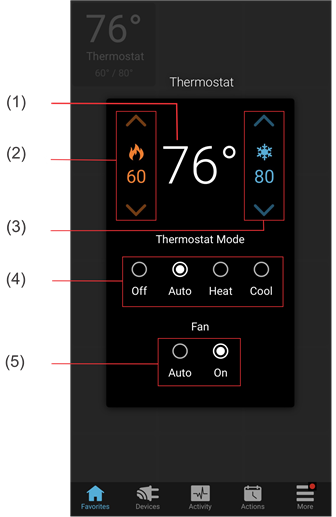
(1) Temperature setting displays on the ClareHome UI in Fahrenheit.
(2) Change the Heat set point by tapping the up/down arrow.
(3) Change the Cool set point by tapping the up/down arrow.
(4) Change the Operation mode by tapping the desired radio button.
(5) Change the Fan mode by tapping the desired radio button.
Installing the Côr thermostat
A qualified installation technician should install the Côr thermostat. Refer to the documentation included with your Carrier devices. Clare Controls does not assume any responsibility for damages caused by improper installation or connection to the network. Register your thermostat with on the Côr website before adding and configuring the device in Fusion.
Connecting the Côr thermostat to ClareHome
Registering a Côr account:
After installation, register the thermostat. Registering the thermostat allows you to assign a name to the thermostat, and later, obtain an access token. This is required for Fusion configuration and function within the ClareHome system.
To register the thermostat:
- From your browser, access carrier.com/myhome.
- Click Register next to the Côr thermostat.

- Follow the instructions for account creation as prompted.
Notes- Make sure that you note the email address, password, and thermostat name used. This information is required for Fusion configuration.
- If a name is not assigned during setup, the thermostat displays its serial number. You must assign a name to the device before adding it to your project.
Configuring Côr in Fusion
Once you have installed and registered the Côr thermostat, configure it in Fusion.
To add the Côr thermostat in Fusion:
- Access your project, and then click the Devices tab.
- Click the New Device button
 to display the Select Template dialog, and then browse to Carrier WiFi Thermostat.
Climate > IP Thermostats > Carrier WiFi Thermostat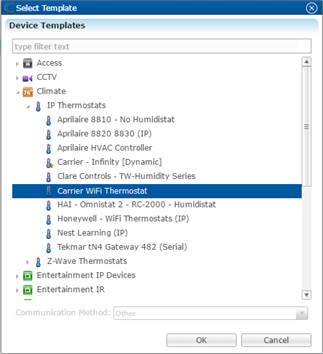
- Click OK.
The Details tab displays.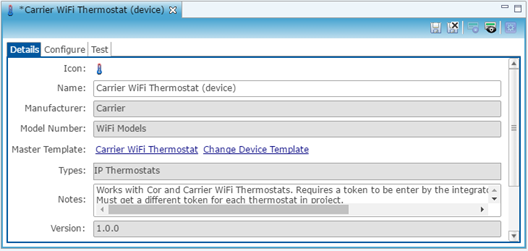
- Enter a name and notes for the thermostat.
- Click the Configure tab, and then enter values in the following fields:
Thermostat ID: Enter the thermostat number associated with that Côr thermostat.
Note: The Thermostat ID is unique. We recommend numbering the thermostat in installation order. For example, the first thermostat installed has the thermostat id of 1, the second thermostat has a thermostat id of 2.
Device Name: Enter the same name assigned to the Côr thermostat in registration.
Note: The device name is case sensitive.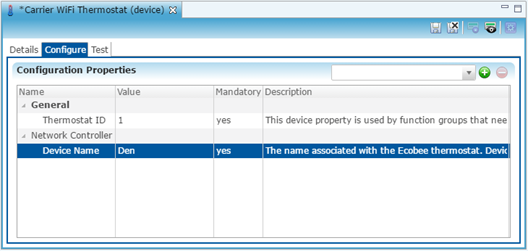
- Click the Save button
 .
.
The Create Service dialog displays.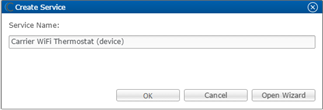
- Click OK, the service is automatically created for you.
Note: You can select Open Wizard to check or change the controls points as needed. - Deploy the project.
You must pair the thermostat after deploying the project.
Pairing the thermostat
Note: The device must be deployed before it can be paired.
After you have configured the Côr in Fusion and deployed, you must pair the thermostat to the project. You will need access to the Fusion and the Clare Controls Côr website.
To pair the thermostat to your project:
- Access your Fusion project, and then double click on the Côr thermostat.
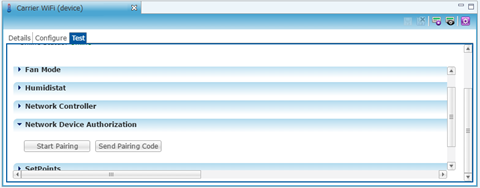
- Click the Test tab, and then expand Network Device Authorization.
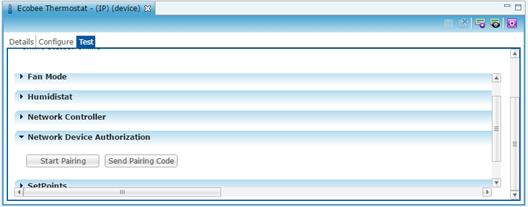
- Click Start Pairing.
The Operations Arguments dialog displays.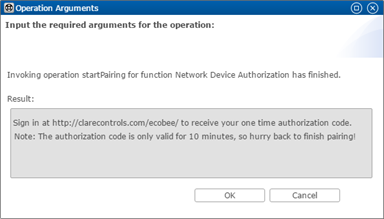
- Copy the web address displayed in the dialog (https://www.clarecontrols.com/ecobee/), and then click OK.
- Open a new browser tab and browse to the copied url.
The Clare Controls Côr landing page displays.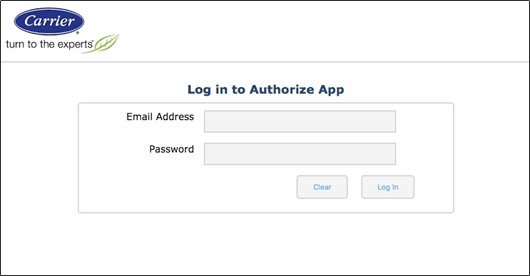
Note: If you are currently logged into the Côr website, the Authorize App dialog displays. You will not have to log in again. - Login with the credentials used for the Côr website.
You are prompted to authorize ClareHome to access the thermostat.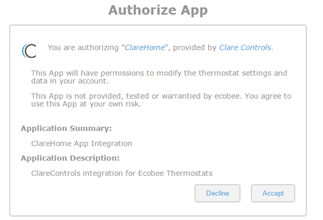
- Click Accept.
The thermostat token displays.
- Click Copy to Clipboard, and then return to the Fusion browser tab.
- Click Send Pairing Code.
The Operations dialog displays.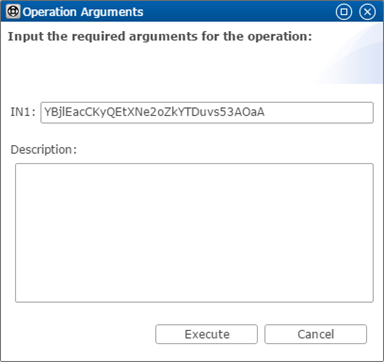
- Paste the token into the Operation Arguments IN1 field, and then click Execute.
Test the thermostat to ensure that it is connected to ClareHome.
To test the Côr thermostats connection:
- Double click the thermostat, and then click the Test
- Expand SetPoints.
The current setpoints are displayed.
Configuring rules with the Côr thermostats
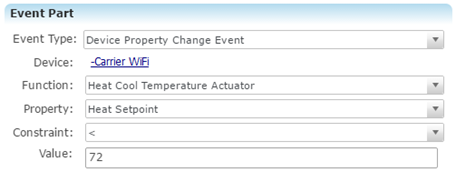
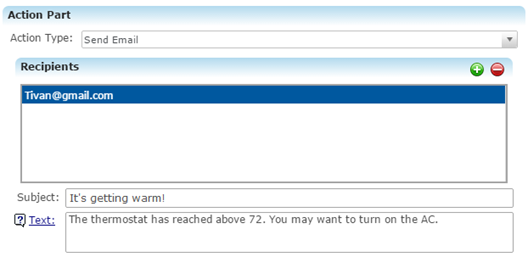
Configure a rule for your thermostat. The example below shows how to set a rule for alerting the customer of the home’s temperature. If the thermostat reaches above 72°F, an email notification is sent.
To create a rule for the thermostat in Fusion:
- Access your project, and then click the Rules tab.
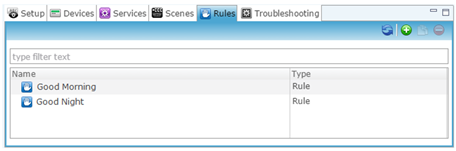
- Click the New Rule button
 .
. - Enter a name for the rule, and then select the Enable Rule checkbox.

- Configure the Event Part as below.
- Event Type: Device Property Change Event
Note: This event type is replacing the Device Property Change Event.
- Device: Côr thermostat
- Function: Heat Cool Temperature Actuator
- Property: Heat Setpoint
- Constraint: <
- Value: 72
- Event Type: Device Property Change Event
- Configure the Action part as below.
- Action Type: Send Email
- Recipients: The homeowner’s Email address
Note: To add an Email address, you must click the green plus icon . Do this for each desired Email recipient.
- Subject: The purpose of the alarm
- Text: The information included in the email
- Click the Save button
 , and then deploy the project.