This outline will guide you through replacing a ClareOne Panel on an Account using FusionPro. During this process, you will be prompted to create a backup of the existing ClareOne Panel configuration, as well as any LTE and Central Station configurations. Please make sure you read and understand the important notes listed below.
NOTE: Devices that require additional account linking such as Ecobee thermostats, etc., will require you to re-link the account to the new ClareOne Panel separately.
NOTE: Make sure the ClareOne Panel you want to swap to is online and updated to the latest firmware. You cannot restore a backed-up project to a new ClareOne Panel unless it has been updated.
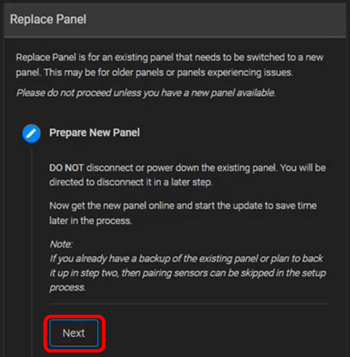
CAUTION: Do not disconnect or power down the ClareOne Panel until prompted to by the Replace Controller Wizard.
How To:
-
- Open the Account where you would like to replace the ClareOne Panel.
- Navigate to the Maintenance tab.

- Select Replace Controller to initiate the Replace Controller Wizard.
- Prepare New Panel: Ensure you have read the important notes in the Wizard and tap Next.
- Backup Panel (Optional): If you would like to restore the ClareOne Panel configuration to a new Panel, you can create a backup of the panel configuration when prompted by the Wizard. Items that are backed up during a backup stage include:
- User settings and PINs
- User-created Actions
- All ClareOne configured settings
- Connected device settings (excluding any device that requires third-party account linking. You will need to manually re-link these after the backup restoration).
After you create a backup, tap Next.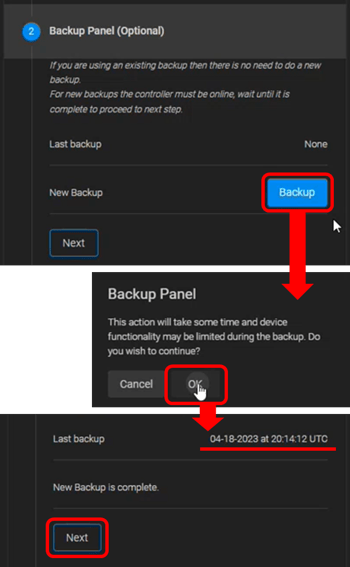
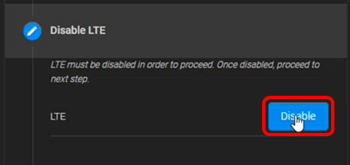
- Disable LTE: If LTE is enabled on the ClareOne Panel, you will be prompted to Disable it. Tap Next.
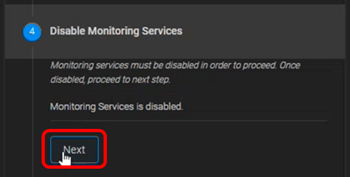
- Disable Monitoring Services: If Monitoring Services are enabled on the ClareOne Panel, you will be prompted to back up the Monitoring Services. Tap Next to continue.
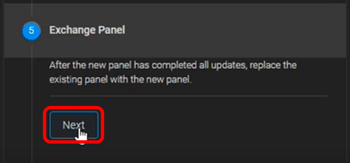
- Exchange Panel: Ensure the replacement ClareOne Panel is online and up to date. Tap Next to continue.
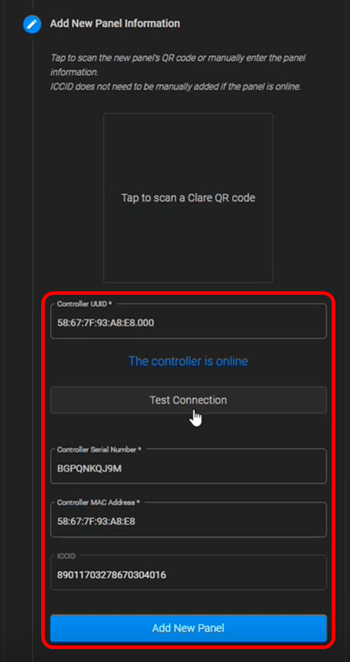
- Add New Panel Information: Input the replacement ClareOne Panel UUID, Serial Number, Mac Address, and ICCID number. Tap Test Connection to check connectivity to the replacement panel. Tap Add New Panel, then Next to continue.
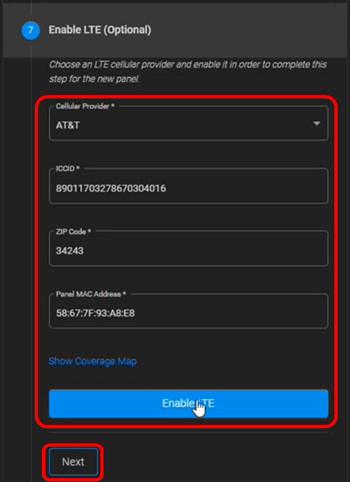
- Enable LTE (Optional): If LTE was enabled previously, restore LTE services by selecting the original service provider. Tap Enable LTE, then Next to continue.
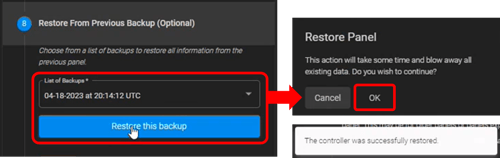
- Restore From Previous Backup (Optional): Restore the previously backed-up project to the replacement panel by selecting the backup and tapping Restore this Backup. This process could take a few minutes and the ClareOne Panel may reboot. Once the backup is restored, tap Next to continue.
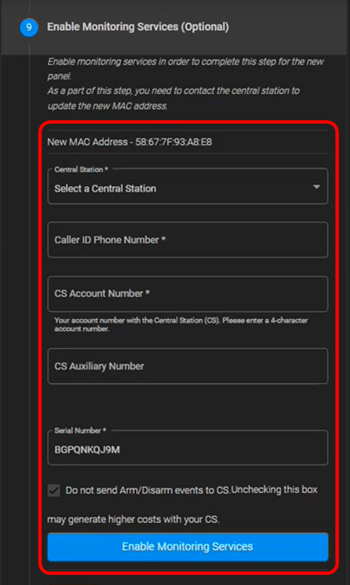
- Enable Monitoring Services (Optional): If Monitoring Services were configured for the project, you can restore the Monitoring Services by selecting the Central Station and inputting the Caller ID Phone Number, CS Account Number, CS Auxiliary Number, and Serial Number. Tap Next to continue or to skip the step.
- Check Device Status: Check the ClareOne Panel Status and tap Done to finish replacing the controller and to close the Replace Controller Wizard.

- You are finished. Ensure the new panel is operating properly and re-link any devices that use separate third-party accounts.
Last Updated: 04/26/2023