In this article, we will cover the step-by-step setup process for adding a ClareVision camera to a Luma NVR.
Adding a ClareVision camera connected to the same network
- Set up the ClareVision camera as you normally would as a standalone camera on the network. Ensure the camera is updated to the latest firmware found here. We suggest setting a static IP address on the camera as we will use that IP address in the Luma NVR channel configuration.
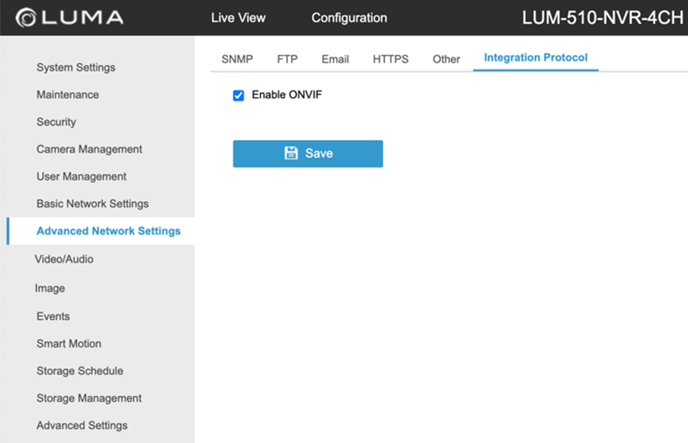
- Enable ONVIF on the Luma NVR:
- Log into the Luma NVR and navigate to the settings.
- Select Advanced Network Settings.
- Go to Integration Protocol.
- Enable ONVIF.
- Configure a channel on the Luma NVR:
-
- Log into the Luma NVR and navigate to the settings.
- Select Camera Management.
- Select the unused channel dedicated for this ClareVision camera.
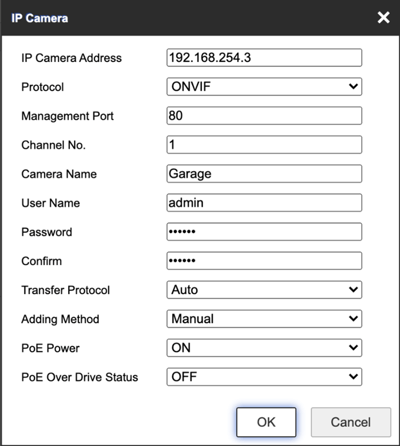
- With the channel selected, select Modify.
- Change the IP Camera Address to the static IP of your ClareVision camera.
- Change the Adding Method to Manual.
- Change the Protocol to ONVIF.
- Enter the Camera Name.
- Enter the ClareVision camera Username and Password.
- Tap OK.


Adding a ClareVision Camera connected directly to the Luma NVR
The Luma NVR has an internal network for cameras that are connected directly to it. This network helps keep the video streaming traffic down on the main network. When a 3rd party camera, like ClareVision, is connected directly to one of the NVR ports, a static IP address must be assigned to the ClareVision camera in order for the Luma NVR to communicate to it.
- Set up the ClareVision camera as you normally would as a standalone camera on the network.
- Check the IP address of the Luma NVR channel you will be plugging the ClareVision camera to. We are using channel 2 - 192.168.254.3 for this example.

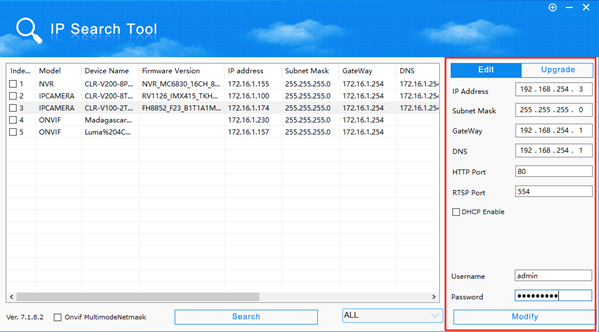
- Change the IP address of the ClareVision camera to the IP address of the Luma NVR channel you will be using. This may be done in the IP search tool or through the ClareVision camera user interface.
- Open the IP search tool, select your ClareVision camera, uncheck DHCP, and edit IP settings. Tap Modify to save.
- Disconnect the ClareVision camera from the network and connect it to the Luma NVR port. Make sure the NVR channel IP address matches the ClareVision camera IP address.
- Configure the channel on the Luma NVR:
- Log into the Luma NVR and navigate to the settings.
- Select Camera Management.
- Select the unused channel dedicated for this ClareVision camera.
- With the channel selected, select Modify.
- Change the Adding Method to Manual.
- Change the Protocol to ONVIF.
- Enter the Camera Name.
- Enter the ClareVision camera Username and Password.
- Tap OK.
- Configure the channel Events and Storage Recording as desired.
Last Updated: 10/22/2021