Overview
The following guide is a basic overview of how to manage the settings on your ClareVision Smart Video Doorbell (VDB) CLR-V200-VDB. Refer to the ClareVision Smart Video Doorbell Quick Start Guide for installation instructions.
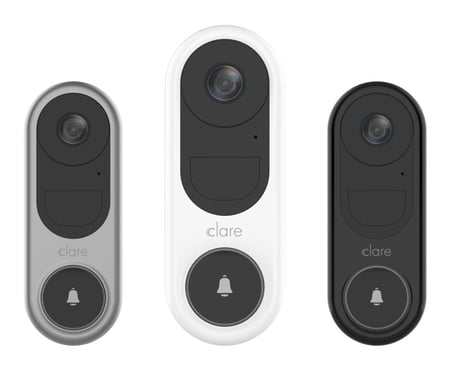
The ClareVision Smart Video Doorbell is a powerful surveillance and security upgrade to the entrance of a home. The VDB combines video capabilities, AI-assisted smart analytics, WiFi connectivity, and two-way voice calling into a single, slim surveillance device that uses your existing VDB wires for power. The VDB can be accessed from the ClareVision App or integrated into the ClareOne Wireless Security and Smart Home Panel for instant live video access and two-way voice on demand or prompted when the ring button is pressed.
The VDB includes a 16GB micro-SD card for local video storage that can be expanded up to 512GB, and features a 2MP image sensor at Full-HD 1080p resolution, and support for 2.4 and 5GHz Wi-Fi connectivity. Included in the box are black, white, and satin nickel cover plates, stand-off wall plates, and angled wall plates.
ClareVision Application
All ClareVision Smart Video Doorbell settings are managed using the ClareVision application which is supported on both Android and iOS devices. Download the application from the Google Play Store or the Apple App Store. The doorbell is supported on the following versions of the applications.
- Android – ClareVision v2.1.5 or newer
- iOS – ClareVision v2.1.8 or newer

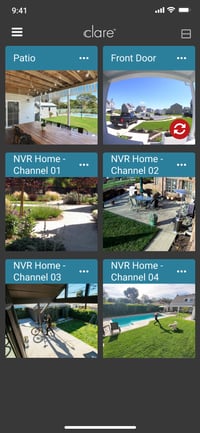
Live View and Event Playback
Live View and Event Playback can be accessed by tapping the image tile on the ClareVision app main screen. The Live View is displayed first after tapping the tile. The following functions are available while in Live View.
Live View Options
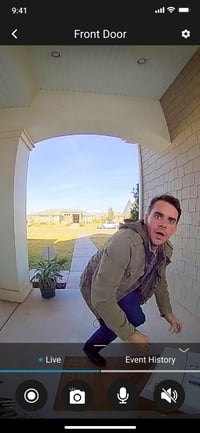
- Video Capture – tap the “target” icon to initiate a video capture to your mobile device. Tap it while active to stop the recording.
- Snapshot Capture – tap the “camera” icon to capture a snapshot to your mobile device.
- Send audio to the VDB – tap the “mic” icon to send audio from your mobile device to the VDB. Tap it while active to stop sending audio.
- Receive audio from the VDB – tap the “speaker” icon to receive audio from the VDB. Tap it while active to stop receiving audio.
- Settings – Tap the “gear” icon access the VDB settings menu.
- Event History – tap the Event History tab to get access to recorded events.
Event History
Events for the current day are filtered by default. A message indicating there are no events if there are no events for the default filter, change the event filters to view other days. The event at the top of the event list will automatically load and playback when Event History is opened.
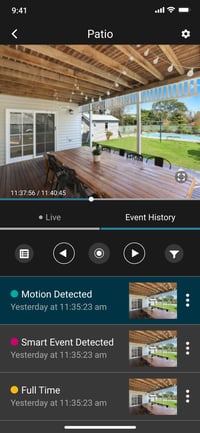
- Moving between events – Tap the Right or Left arrow icons to move to the next or previous event on the list.
- Video Capture – tap the “target” icon to initiate a video capture to your mobile device. Tap it while active to stop the recording.
- Expanded event list view – tap the “list” icon to expand the list of available events, tap an event on the list to view it.
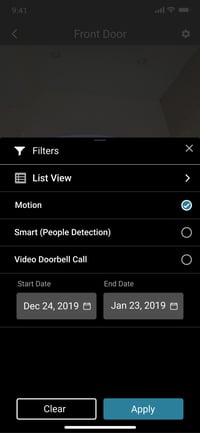
- Change event list view filters – tap the “filter” icon to display the event play back filter screen.
- Select or deselect the event types to filter events by type.
- Tap the Start Date to choose a different start date filter.
- Tap the End Date to choose a different end date.
- Tap Apply to activate the selected filter and display events that match the filter settings.
- Tap Clear to reset filters.
- Tap X to leave the filter menu without saving the changes.
- Tap the list view to see the expanded list of events with no filters applied.
Pull-Up Menu
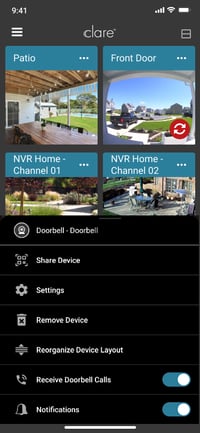
The VDB Pull-up menu is provided to give you quick access to settings used more frequently on the VDB. To access the VDB Pull-up menu, tap the three dots on the top right of the VDB image tile on the main screen. Available options on the Pull-up menu are:
- Share Device
- Settings
Remove Device - Reorganize Device Layout
- Receive Doorbell Calls toggle
- Receive Notifications toggle
Share Device
Use this option to share the VDB on another device with the ClareVision app. Tap the option and a QR Code is displayed. Follow the add VDB options on the second device to scan the QR code from the first device to the second.
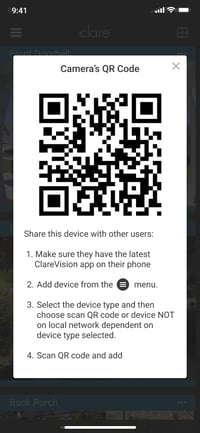
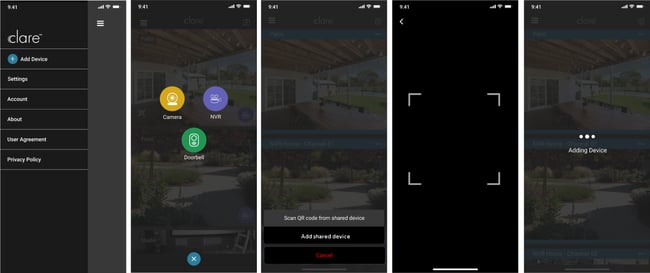
After displaying the QR code on the first device, do the following to add it to the second device:
- Tap settings
- Select Add Device
- Select Doorbell
- Tap Add Shared Device
- Scan QR Code
- VDB adds to second device
Settings
Provides access to all VDB settings.
Remove Device
Removes the VDB from this device.
Note: Removing the VDB from the first device (Primary Device) which was used to perform the initial set up will require the VDB to be reset and setup again on this device or a new device to be able to use again. If the VDB is removed from the primary or secondary device it will continue to work on the ClareOne panel if configured.
Reorganize Device Layout
Opens the move tile screen to allow user to move tiles around on the main screen for the users’ preferred main view. Reorganizing the device layout affects only the device on which the layout is changed.
Receive Doorbell Calls toggle
The device will receive calls from a VDB button push when enabled. The setting is specific to the application device and does not affect other devices which are also connected to the VDB.
Receive Notifications toggle
The device will receive event notifications from the VDB. The setting is specific to the application device and does not affect other devices which are also connected to the VDB.
Note: Receive Doorbell Calls and Receive Notifications are independent settings on Android devices only. They are all on or all off on iOS devices.
Settings
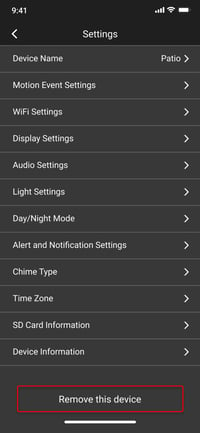
The Settings screen provides additional settings for the VDB. Normally these settings only need to be configured once during set up but are always available for additional configuration as needed. Available settings are:
- Device Name
- Motion Event Settings
- WiFi Settings
- Display Settings
- Audio Settings
- Light Settings
- Day/Night Mode
- Alert and Notification Settings
- Chime Type
- Time Zone
- SD Card Information
- Device Information
Device Name
Select to change the name of the VDB as it appears on the main screen. Changing the name does not affect any of the display settings
Motion Event Settings
Select to configure Ordinary Motion Events and Smart Detection Events (default setting). Either Ordinary Motion or Smart Events can be configured at any given time. Selecting and configuring Ordinary Motion will disable Smart Detection and vice versa.
Note: that Ordinary Motion is much more sensitive than Smart Events and may result in false events due to simple movement in the landscape or changes in lighting.
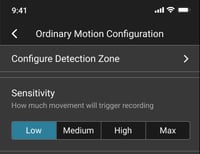
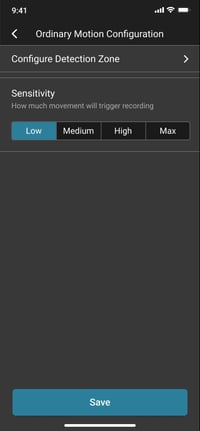
Ordinary Motion Events
- Tap the arrow next to Ordinary Motion and select continue when prompted to disable Smart Motion Detection to configure.

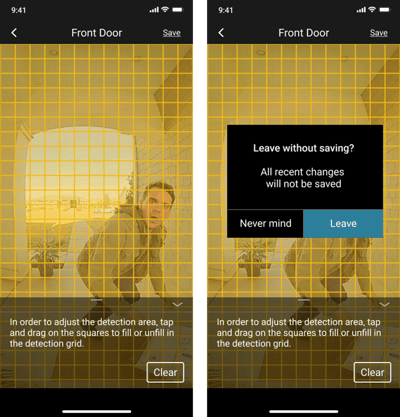
- Tap the arrow next to Configure Detection Zone to configure the areas which will be included in the Ordinary Motion Events detection area.
- All yellow shaded squares are active detection areas, tap on a square or tap and drag from one square to another to deselect or select the detection area.
- Tap Clear to clear all selected squares.
- Tap save when done. A confirmation message will appear if you change and detection areas and do not save before you exit.
- Select the desired sensitivity for Ordinary Motion detection and tap Save.
- Continue to monitor your VDB events an adjust motion detection areas and sensitivity until the desired event detection has been configured.
Note: Sensitivity settings are defined as "How much movement will trigger a recording". Where Low means less movement is required to trigger an event while Max means more movement is required to trigger an event.
Smart Detection Events
- Tap the arrow next to Smart Motion Detection and select continue when or if prompted to disable Ordinary Motion Detection to configure.

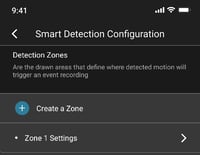
- Smart Detection Events uses AI-assisted smart analytics to detect humanoid figures in the detection areas called Zones. By default, the VDB has one zone configured which covers the entire area of the image. In most instances no changes need to be made to the zone(s). Tap the right arrow next to Zone 1 Settings to modify it.

- The Time Threshold is the amount of time the figure should remain in the detection area before an event is triggered and recording starts. The default is 0 seconds, adjust the slider to choose the desired threshold. The setting is automatically saved after each adjustment.
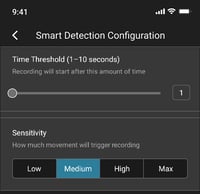
- Select the desired sensitivity for Smart Detection Events, the setting is automatically saved after each adjustment.
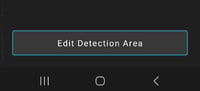
- Tap Edit Detection Area to adjust the capture area.
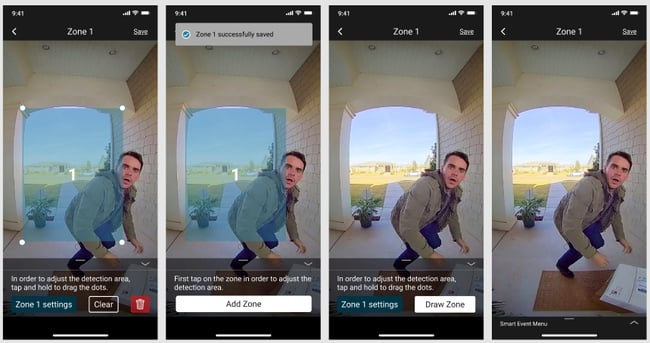
- Tap the down arrow above the “Garbage Can” to hide settings options and allow better access to area adjustments.
- Use the corner dots to adjust the detection area by holding the dot and dragging the corner to the desired location.
- Tap Clear to remove current area then tap Draw Zone to create a new area.
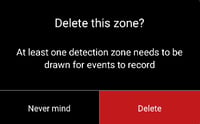
- Tap the “Garbage Can” to completely remove the zone. Confirm or cancel the deletion when prompted.
- Tap Zone # Settings button to save detection are settings.
- Tap Create a Zone to add another Smart Detection Zone. Follow instructions above to adjust second and each subsequent zone.
- Tap the left arrow to leave Smart Detection Configuration.
WiFi Settings
WiFi settings enables users to connect the VDB to a new WiFi network. There are three scenarios in which this is necessary. Each is described below and can be managed by the user with the ClareVision app.
Scenario 1
VDB is already connected to a WiFi network, but user wants to connect it to another available WiFi network.
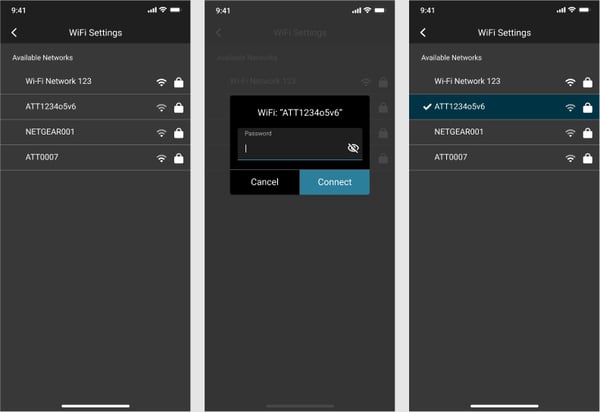
- Open WiFi Settings, a list of available Networks is displayed. Note that the strongest networks are listed first.
Note: Networks with 1 bar may not work as they are not strong enough to maintain a solid connection with the VDB. Networks with 2 bars should be analyzed for signal strength using a third part WiFi analyzer. A signal strength of -60 or better is best- 61 or worse may fail to maintain a solid connection. - Tap on the desired network, enter the WiFi password, and tap on Connect. The VDB will reboot and connect to the new WiFi network.
- Exit settings and confirm VDB is active on the new network.
Scenario 2
The WiFi password has changed on the existing network or WiFi network SSID has changed and VDB is not actively connected to a WiFi network.
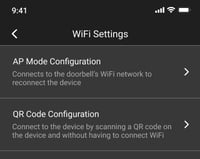
- Open WiFi Settings and when prompted choose QR Code Configuration.

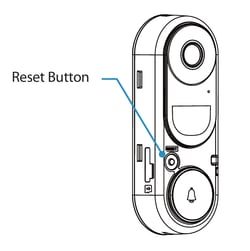
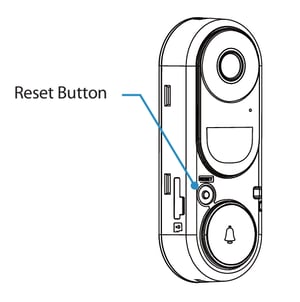
- Press and hold the VDB reset button until you hear the message, “Doorbell is ready to connect to WiFi”, approximately 5-7 seconds, and starts flashing blue at 1s intervals.
- Connect the application device to the same WiFi network that the VDB is to be connected to.
- Tap Next on Step 1.
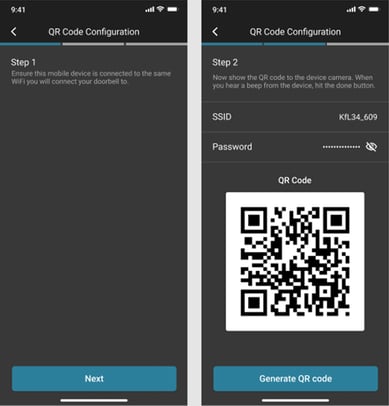
- Confirm the target SSID is listed correctly in Step 2. If it isn't you can either of the following:
- Manually enter the correct SSID if it is known.
- Back out of the WiFi settings, connect the phone to the correct WiFi network then restart Scenario 2.
- After validating SSID, enter and confirm the SSID password.
- Hold the QR code image about 10 inches in front of VDB lens. Slowly move the device towards the VDB until you hear the message “WiFi is connecting, please wait” followed by “WiFi is connected, doorbell is active”.
- Tap Done after both messages are confirmed and the VDB light is solid blue.
- Exit settings and confirm VDB is active on the new network.
Scenario 3
WiFi network SSID has changed or a new network has been installed and VDB is not actively connected to a WiFi network.
- Press and hold the VDB reset button until you hear the message, “Doorbell is ready to connect to WiFi”, approximately 5-7 seconds, and starts flashing blue at 1s intervals.
- Open WiFi settings on your application device and join the Access Point (AP) SSID being broadcast from the VDB. The SSID will be “VDB_xxxxxxxx”, where “xxxxxxxx” is the last 8 characters of the VDB UID. The SSID is also printed on the label affixed to the back of the VDB.
- Open WiFi Settings in the app and when prompted choose AP Mode Configuration.
- If properly connected to the VDB AP the AP Mode Configuration menu will appear with a “Continue” button on the bottom, tap Continue. The available networks will display with strongest network listed at the top.
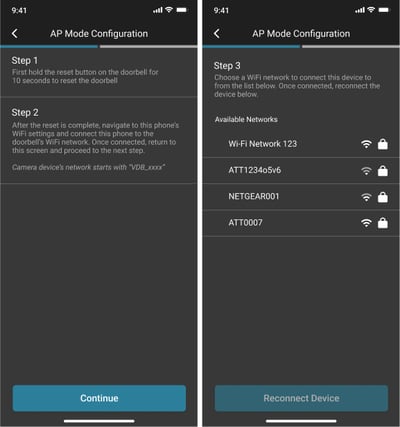
- Select the target WiFi and when prompted enter and the WiFi password, then tap Connect.
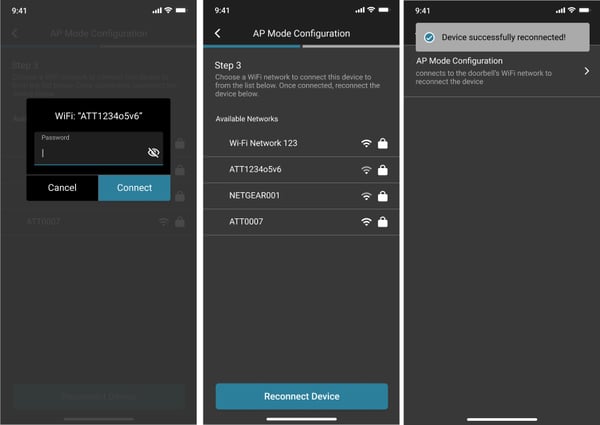
- Tap Reconnect Device, VDB will play the message “WiFi is connecting, please wait” followed by “WiFi is connected, doorbell is active”.
- Exit settings and confirm VDB is active on the new network.
Audio Settings
Select Audio Settings to adjust the VDB’s built-in microphone and speaker. 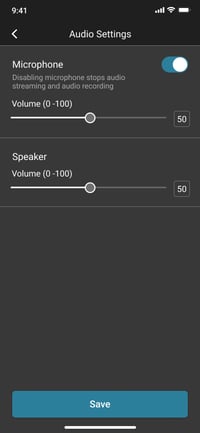
- The microphone sensitivity can be adjusted on a scale from zero (0) to one hundred (100), where 0 is least sensitive and 100 is most sensitive. Fifty (50) is the default setting.
- The microphone can also be disabled and enabled toggling the slider left and right. Enabled is the default.
- The speaker volume can be adjusted on a scale from zero (0) to one hundred (100), where 0 is the lowest setting and 100 is highest. Eighty (80) is the default setting.
- Tap Save when settings have been adjusted as preferred.
Light Settings
The light settings adjust the sensitivity of the IR LEDs which illuminates the area in front of the VDB when the ambient lighting is too low to adequately light the subject when capturing video. The settings are Auto and Manual.
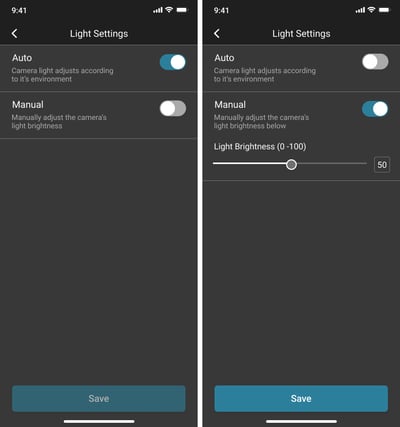
- When set to Auto the sensitivity is automatically configured for the available lighting. Auto is the default and is good for most environments.
- Enable Manual and adjust the intensity slider from zero (0) to one hundred (100), where 0 is the least intense and 100 is most. Fifty (50) is the default setting.
- Tap Save when settings have been adjusted as preferred.
Day/Night Mode
Day/Night Mode enables you to determine when or if the IR “night” lighting and lens sensitivity settings are enabled. The settings are Auto (default), Day Mode, or Night Mode. Only one option can be enabled at any given time.
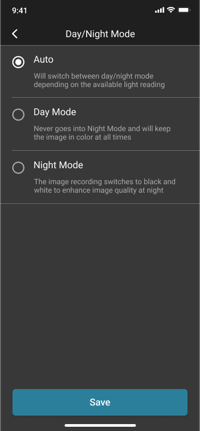
- In Auto Mode the VDB automatically determines when the IR lights will activate and lens light sensitivity is adjusted to assist in lighting the subject when ambient lighting is too weak.
- Day Mode effectively disables the VDB from switching to Night Mode.
- Night Mode effectively disables Day Mode.
- Tap Save when settings have been adjusted as preferred.
Alert and Notification Settings
Alert and Notification Settings are configured to allow the application device to receive calls from the VDB and/or turn on and off notifications for events. The two settings are Receive Doorbell Calls and Notifications enabled or disabled. The settings are specific to the application device and does not affect other devices which are also connected to the VDB. The settings can also be configured on the Pull-up menu.
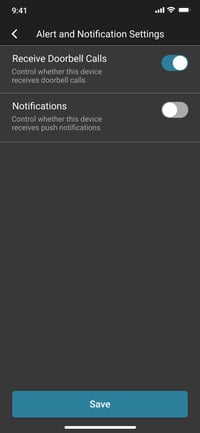
- Receive Doorbell Calls toggle enables or disables push button calls to the application device from the VDB. The device will receive calls from a VDB button push when enabled.
- Receive Notifications toggle enables or disables event notifications from the VDB.
- Tap Save when settings have been adjusted as preferred.
Note: Receive Doorbell Calls and Receive Notifications are independent settings on Android devices only. They are all on or all off on iOS devices.
Chime Type
Chime type allows you to change the type of physical chime the VDB is connected to. This is ordinarily set up when the VDB is initially installed and connected to the application device. It can also be changed after it is connected if the chime type has changed, or the incorrect chime type was selected during initial setup.
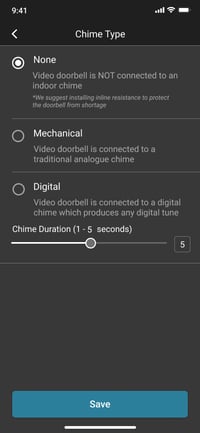
- None is the default setting and is selected when there is the VDB is not physically connected to a doorbell chime
- Mechanical is selected when the VBD is connected to a mechanical chime. A chime that has the traditional “ding-dong” sound.
- Digital is selected when the VDB is connected to a digital chime. A chime that produces an electronic musical tune. The time slider 0-5 is adjusted to allow the digital chime to complete the sound.
- Tap Save when settings have been adjusted as preferred.
Time Zone
Time Zone and DST settings are set according to the geographical location of the VDB. Time stamps are provided with events and in live view according to the configured time settings.
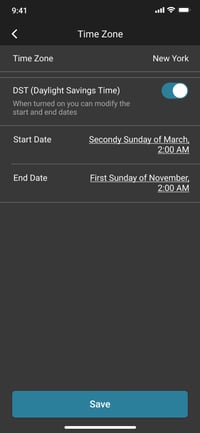
- The default Time Zone is New York/EST. Tap on New York to select a different Time Zone.
- The default DST settings are configured for the United States. Tap on the Start or End date to adjust DST If your DST settings are different. Disable DST if your time zone does not observe DST, Arizona and Hawaii are two US states that do not observe DST.
- Tap Save when settings have been adjusted as preferred.
SD Card Information
SD Card Information provides data about the micro SD card installed in your VDB. A 16Gb micro SD card is included with the VDB. The VDB supports up to a 512Gb micro SD card.
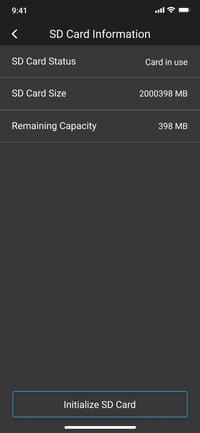
- SD Card Status provides general info about the condition of the SD card.
- Card in use – indicates a card is installed and operating properly.
- SD card not initialized – indicates a card is installed but is not initialized or formatted. Tap Initialize SD Card to make the card ready for use in the VDB.
- No card found – indicates that the VDB does not detect an SD card. One may be inserted but not properly seated or one may not be installed at all. Check the physical status of the SD card.
- SD Card Size – provide the total storage capacity of the installed SD card in mega bytes
- Remaining Capacity – provides the total available storage on the installed SD card. Note that low or no remaining capacity does not mean there is an issue with the SD card, this is normal. The VDB stores events and call recordings on a First In First Out (FIFO) basis. The means that as new recordings are placed on the card, the oldest recordings are erased to make room for them.
- Initialize SD Card – should be used only when a new SD card is inserted or there is an issue with the currently installed SD card.
Note: Initializing a working SD card will result in the deletion of all existing recordings.
Device Information
Provides information about the connected camera, in the case of the VDB, it includes the part number, name of the vendor, and the currently installed firmware version. An indicator is provided on the image tile of the doorbell if a new firmware update is available .
Answering a call from the VDB
When a call is presented to your application device it may appear as a notification or as a full screen pop-up. The method in which it’s presented depends on the status of the device and the application.
Call notification icons
 |
Call Reject Icon |  |
Call Answer Icon |
Android
|
Device Status |
App Status |
Call Presented As |
How To Answer |
|
Asleep |
n/a |
Notification with ringing and/or vibration depending on ringer status |
|
|
Awake |
Background |
Call presented as a banner |
Tap answer icon to answer or reject icon to refuse the call,or… Tap the banner to see live video before choosing to answer or reject the call
|
|
Awake |
Open |
Call presented with live view preview |
Tap answer icon to answer or reject icon to refuse the call |
iOS
|
Device Status |
App Status |
Call Presented As |
How To Answer |
|
Asleep |
n/a |
Notification with ringing and/or vibration depending on ringer status |
|
|
Awake |
Background |
Call presented as a banner |
Tap the banner to see live video preview. Tap answer icon to answer or reject icon to refuse the call
|
|
Awake |
Open |
Call presented with live view preview |
Tap answer icon to answer or reject icon to refuse the call |
Firmware Updates
Occasionally a firmware update for the VDB firmware may be required. New updates are posted in the cloud and when available will be indicated in the app with an update icon . Tap the icon and follow the prompts to complete the update.
Note: The VDB will reboot as part of the update and the update icon will no longer show in the app when the update is complete.
How to factory reset the VDB
When required the VDB can be reset to factory defaults. Press and hold the reset button until the second message is heard, “Doorbell has been reset and will reboot”, about 10-15s. When the reboot is completed, the VDB will play the message, “Doorbell is ready to connect to WiFi” and flash blue at 1s intervals.
Note: Resetting the VDB will require that it be removed from all associated devices and added back per the instructions in the Quick Start Guide.
LED Indicator
|
|
Solid Red |
Doorbell is powering on |
|
|
Flashing Red |
Memory card exception |
|
|
Solid Blue |
Doorbell is operating correctly |
|
|
Flashing Blue |
Doorbell is ready for WiFi configuration |
|
|
Flashing Red/Blue |
Network Exception |
Last Updated: 01/18/2024