Introduction
When integrating a Clare Controls Wi-Fi thermostat into your ClareHome project, no extra connections are necessary. Install the thermostat per the Clare Controls documentation, access the thermostat using the IP address, configure the thermostats settings, and then connect it to the network.
All HVAC integrations share a common UI, so that the user experience is consistent. Temperature settings can be controlled via events. Use Fusion’s Scenes and Rules to automate the actions your customers want.
Note: The Clare Controls thermostats are programmed with a default schedule. This schedule can interfere with ClareHome and Fusion configuration. Disable the default schedule to allow greater customer access and control. Follow the integration notes below.
Supported models:
- CH-TSB10-WF
- CH-TSM10-WF
The Following figure shows the Clare Thermostat on the ClareHome UI.
Figure 1: User interface of the CH-TSB10-WF thermostat
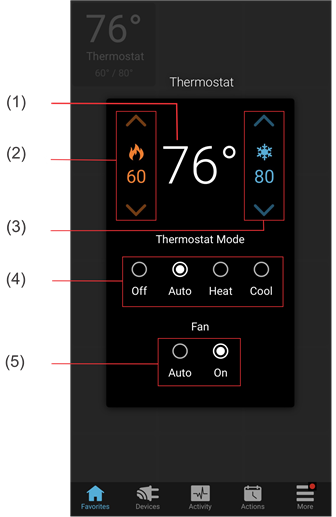
(1) Temperature setting displays on the ClareHome UI in Fahrenheit.
(2) Change the Heat set point by tapping the up/down arrow.
(3) Change the Cool set point by tapping the up/down arrow.
(4) Change the Operation mode by tapping the desired radio button.
(5) Change the Fan mode by tapping the desired radio button.
Installing the Clare Controls thermostat
A qualified HVAC installation technician should install the Clare Controls thermostat. Refer to the documentation that came with the thermostat for detailed installation instructions. Clare Controls does not assume any responsibility for damages caused by improper installation or connection to the data network.
Connecting to ClareHome
After installation, you must connect the thermostat to Wi-Fi, enable auto changeover, disable the default schedule, and then verify the thermostat is set to automation system. This allows the thermostat to be accessed remotely and updated with information from the Clare Home App.
Note: The thermostat is set to Automation System by default. If it is no longer set to Automation System, the thermostat will not connect to ClareHome.
To connect the Clare Controls thermostat to Wi-Fi:
Note: When the Clare Controls Wi-Fi thermostat is powered on, it broadcasts its own Wi-Fi.
- Use a laptop, Android smartphone, or iOS device to connect to the Clare Controls thermostat’s Wi-Fi.
Note: The Wi-Fi appears as CLAREHVACXXXX. The X’s are replaced with the last 4 characters of the MAC address. For example, if you are using a Clare Controls Wi-Fi CH-TSB10-WF with the MAC address AA:F4:E6:B1:22, the Wi-Fi network is CLAREHVACB122. - Browse to http://192.168.1.99/clare.html to access the thermostat’s web interface.
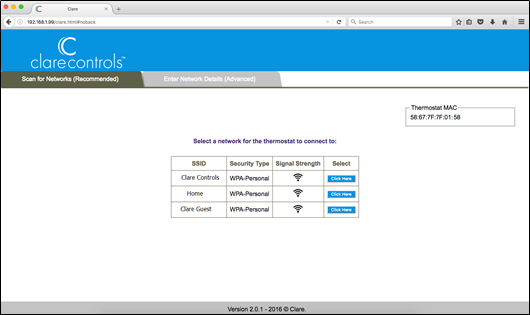
- Click Click here next to your home’s wireless network.
- Enter the password.
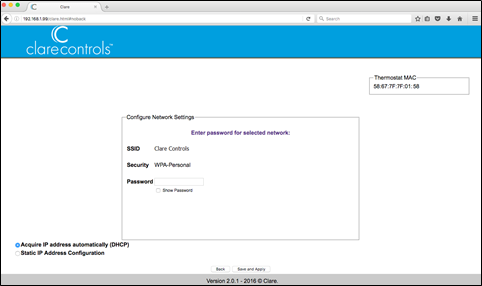
- Click Save and Apply.
The Clare Controls settings are saved.
Enabling auto changeover
Enable auto-changeover to allow the thermostat to automatically switch between heat and cool modes. Once auto-changeover is enabled, the thermostat reboots.
To enable auto changeover in the CH-TSB10-WF:
Note: Verify that the Thermostat Mode is set to off prior to changing the schedule settings. To do this, tap Mode until the thermostat displays off.
- Press and hold the thermostat’s Mode and Up buttons until the displayed screen changes.
- Press the Next arrow to select the menu option.
- Press Mode until you reach option 12.
- Press the up/down arrow to toggle to 1.
- Press Mode until Done displays.
To enable auto changeover in the CH-TSM10-WF:
- Access the thermostat, and then press Mode to set the thermostat to off.
- Press Menu, and then press and hold Setup until the screen changes.
- The thermostat displays Installer Mode Enabled.
- Press Installer Setup to enter the menu, and then press the right Next arrow to select the menu option.
- Verify that the first menu item, 00, is set to Automation System.
- Use the up and down arrows to select option 12, and then press the up/down arrow to enable Auto Changeover.
- Press Done to save, and press it a second time to exit the menu.
Configuring rules with Clare thermostats (optional)
Notes
- The thermostat is auto-discovered by the ClareHome system, no Fusion configuration is necessary.
- This section is optional. It is not required to configure rules for the thermostat in Fusion.
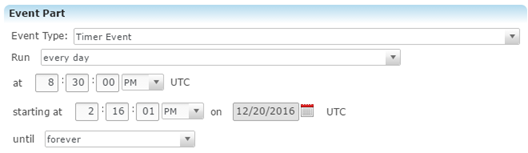
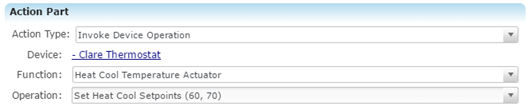
Configure a rule for your thermostat. The example below shows how to set a rule that lowers the thermostat’s temperature to 70 degrees at 8:30 every night.
To create a rule for the Clare thermostat in Fusion:
- Access your project, and then click the Rules tab.

- Click the New Rule button
 .
. - Enter a name for the rule, and then select the Enable Rule checkbox.

- Configure the Event Part as below.
Note: Customize the options below to fit your desired schedule.
- Event Type: Timer Event
- Run: Everyday
- At: 8:30 PM
- Starting at: The desired start time and date
- Until: Forever
- Configure the Action part as below.
- Action Type: Invoke Device Operation
- Device: The Clare thermostat
- Function: Heat Cool Temperature Actuator
- Operation: The desired heat/cool setpoints
- Click the Save button
 , and then deploy the project.