Introduction
The Model Aprilaire 8800 thermostat is an RS-485 communicating thermostat that you can configure for single- and multi-stage heating and cooling or heat pump systems. It has been tested and certified for integration with the ClareHome system.
By integrating the Aprilaire 8800 thermostat to a ClareHome control system, your customers can send commands to the thermostat to change modes, cool and heat settings, and fan status from their smart phones. To adjust temperature settings, simply slide the set points to the right or left on the ClareHome display.
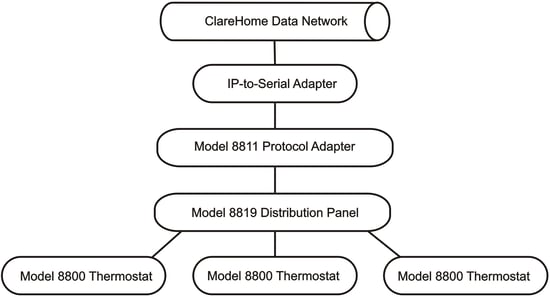
When integrating the Aprilaire Model 8800 thermostat into your ClareHome project, use the Model 8811 protocol adapter to convert an RS-485 communication signal to an RS-232 signal that is readable by a host computer’s serial port. If you are adding multiple 8800 thermostats to your project, you will also need to install the Model 8819 distribution panel. This panel allows you to wire up to eight thermostats and the thermostat communication can be turned on and off by location.
The Aprilaire 8800 thermostat integrates with the ClareHome system in a way similar to the existing HVAC integrations. All HVAC integrations share a common UI, so that the user experience is consistent.
Temperature settings can be controlled via events. Use Fusion’s Scenes and Rules to automate the actions your customers want.
The following figure shows the Aprilaire controls on the ClareHome UI.
Figure 1: Temperature mode showing temperature set points
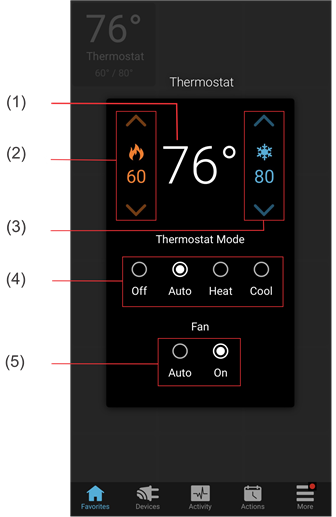
(1) Temperature setting displays on the ClareHome UI in Fahrenheit.
(2) Change the Heat set point by tapping the up/down arrow.
(3) Change the Cool set point by tapping the up/down arrow.
(4) Change the Operation mode by tapping the desired radio button.
(5) Change the Fan mode by tapping the desired radio button.
Installing the Aprilaire 8800 thermostat
A qualified installation technician should install the 8800 thermostats and the 8811 protocol adapter. If you are installing multiple 8800 thermostats, you must also install the 8819 distribution panel. Use this panel to wire up to eight thermostats. Refer to the installation instructions that came with your Aprilaire equipment.
Note: When installing the equipment, your technician must assign each thermostat a numeric address. Please have the technician note the numbers he or she assigns. You will need this number when integrating the thermostats in Fusion.
Connecting the 8800 thermostat to the ClareHome data network
After installing the 8800 thermostat, 8811 protocol adapter, and 8819 distribution panel (if required) connect the 8811 protocol adapter to the ClareHome data network. To make the connection, you will need to attach a serial adapter, such as a Global Cache’ iTach device.
To connect the 8811 protocol adapter to the ClareHome data network:
- Attach one end of a Cat 5 networking cable to a port on the ClareHome data network, and then attach the other end of the cable to RJ-45 jack on the
IP-to-Serial device. See Figure 2. - Using an RS-232 cable, connect the IP-to-Serial device to the 8811 protocol adapter.
- If you are installing only one 8800 thermostat, connect that thermostat to the 8811 protocol adapter. (Refer to the installation documentation that came with your 8800 Thermostat.)
- or -
If you are installing multiple 8800 thermostats, you must connect them to the 8819 distribution panel. Continue with step 4. - Using a Cat 5 networking cable, connect the 8811 protocol adapter to the 8819 distribution panel.
- Connect each 8800 thermostat to the 8819 distribution panel.
Figure 2: Connecting to the ClareHome data network
Setting the serial parameters in the serial device adapter
To ensure proper communication between the Aprilaire 8800 and the ClareHome system, you must configure your IP-to-Serial device with the following settings.
Table 1: Serial adapter settings
|
Serial Parameter |
Setting |
|
Baud Rate |
9600 |
|
Data Bits |
8 |
|
Parity |
None |
|
Stop Bits |
1 |
Note: To configure the serial adapter, follow the manufacturer’s instructions included with the device.
Configuring in Fusion
Once you have installed your Aprilaire 8800 (and the 8811 protocol adapter), you must add and configure it in Fusion. This includes defining the parent and child devices. Follow the steps below to configure your Aprilaire 8800 thermostats in Fusion.
To add an Aprilaire device in Fusion:
- Click the Devices tab, and then click the New Device button
 to display the Select Template dialog.
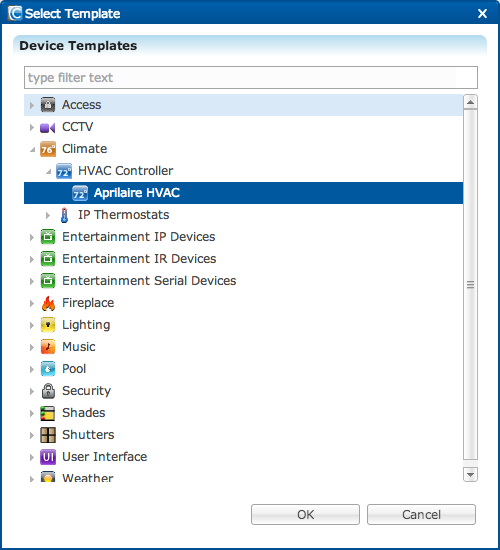
- Expand the Climate folder, and then select Aprilaire HVAC from the list.
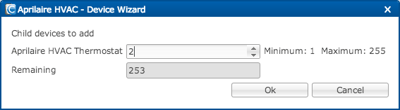
- In the Device Wizard, enter the number of thermostats that you are adding to your project, and then click OK.
- The Detail’s tab displays.
Enter a name for your Aprilaire parent device..png?width=550&name=Details%20tab%20(parent).png)
- Click the Configure tab.
.png?width=550&name=Configuration%20tab%20(parent).png)
- Enter values in the following fields:
- Network Address: Device’s network IP address
- Network Port: Serial port number for the IP-to-Serial device connecting the Aprilaire HVAC module with the ClareHome data network
- Click the Save button
 .
.
Naming the thermostats
Once you have created your thermostats, you must name them.
To name a thermostat:
- Return to the Devices tab, and then double-click the first thermostat to display its Details tab.

- Enter a name for this thermostat.
In our example, the first thermostat is named “Living Room Thermostat.”.png?width=550&name=Details%20tab%20(child).png)
- Click the Configure tab, and then in the Value field, enter the thermostat’s number.
.png?width=550&name=Configuration%20tab%20(child).png)
- Repeat steps 1 through 3 for each additional thermostat in your project.
Creating a service for each thermostat
- On the Configure tab, click the New Service Instance button
 to display the Create Service dialog.
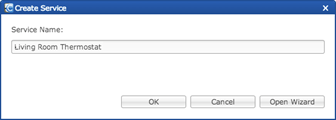
- In the Service Name field, enter a name for your service. This is the name that appears on the customer’s iDevice – for example, Living Room Thermostat.
- Click Open Wizard > Thermostat Service > Next.
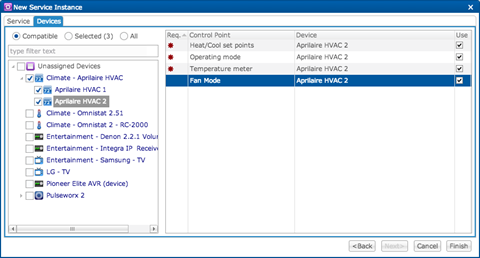
- Fusion displays the New Service Instance Devices tab and auto-populates the control points.
- Click Finished.
- Be sure to deploy your project.