FusionPro: Adding A Clare Video Doorbell v3 to FusionPro
Product Number: CLR-CVP-B3DB50-ODIW
Introduction
This technical bulletin provides direction for connecting the Clare Video Doorbell v3 to the ClareOne panel using FusionPro. Before connecting to ClareOne, the doorbell must be connected to the same local network as the ClareOne panel and configured according to the Clare Video Doorbell v3 Installation and user guide.
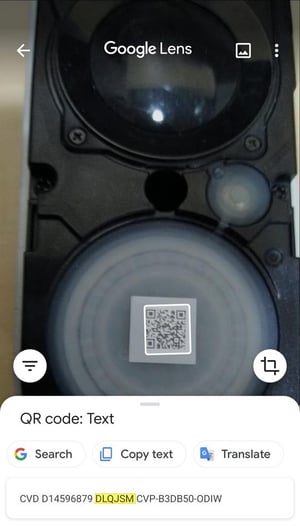
Note: The doorbell verification code is required to add the doorbell to FusionPro. The verification code can be found in the following places. The verification code is always six uppercase letters.
- On the QR code label affixed to the information card located in the original doorbell product box.
- On the QR code label affixed to the back of the doorbell.
- Can be found when scanning the QR code affixed to the label on the doorbell button under the cover. The following is a sample scan of that QR code with the verification code highlighted.

Instructions
- Ensure doorbell is installed and configured according the Clare Video Doorbell v3 Installation and User Guide.
- Ensure doorbell and ClareOne have all current updates applied.
- Open/Edit the FusionPro account to which the doorbell will be added.
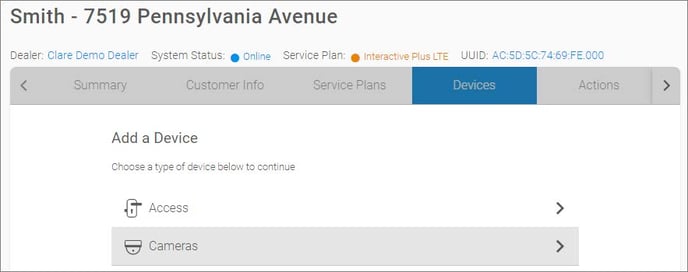
- Click on the Devices tab, then click on the Add Devices button.

- Select Cameras from the Add a Device page.

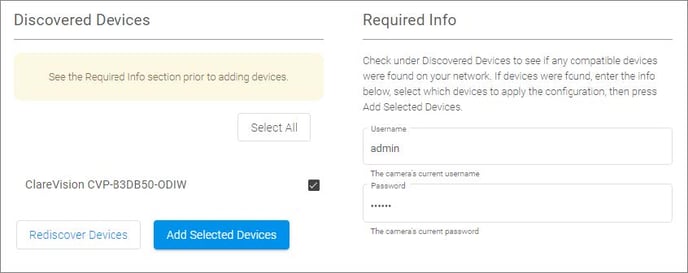
- FusionPro will discover all cameras connected to the network.

- Check the box next to the video doorbell identified by “CVP-B3DB50-ODIW” in the listed cameras.
- Enter “admin” (case sensitive) in the Username field.
- Enter the verification code (case sensitive) in the Password field.
- Click the Add Selected Devices button.
- Camera will add to FusionPro as a new device.
- Add the video doorbell tile to the ClareOne panel and to the ClareOne application.
Last modified: 05/26/2021
Full PDF - Adding CVD V3 to FusionPro Tech Bulletin (DOC ID 2094)